Terraform Proxmox LXC Containers
Infrastructure as Code (IaC) has revolutionized the way we manage and deploy infrastructure. Terraform, one of the most popular IaC tools, enables automation and efficient provisioning of resources. In this guide, we’ll walk through provisioning LXC containers using Terraform on a Debian server.
🏗️ Prerequisites
Creating the user/role for terraform
Log into the Proxmox cluster or host using ssh (or mimic these in the GUI) then:
- Create a new role TerraformProv for the future terraform user.
- Create the user “terraform@pve”
- Add the TerraformProv role to the terraform user
- Create the api tocken for the terraform user
1
2
3
pveum role add TerraformProv -privs "Datastore.AllocateSpace Datastore.AllocateTemplate Datastore.Audit Pool.Allocate Sys.Audit Sys.Console Sys.Modify VM.Allocate VM.Audit VM.Clone VM.Config.CDROM VM.Config.Cloudinit VM.Config.CPU VM.Config.Disk VM.Config.HWType VM.Config.Memory VM.Config.Network VM.Config.Options VM.Migrate VM.Monitor VM.PowerMgmt SDN.Use "
pveum user add terraform@pve --password <password>
pveum aclmod / -user terraform@pve -role TerraformProv
to modify the permissions
1
pveum role modify TerraformProv -privs "Datastore.AllocateSpace Datastore.AllocateTemplate Datastore.Audit Pool.Allocate Sys.Audit Sys.Console Sys.Modify VM.Allocate VM.Audit VM.Clone VM.Config.CDROM VM.Config.Cloudinit VM.Config.CPU VM.Config.Disk VM.Config.HWType VM.Config.Memory VM.Config.Network VM.Config.Options VM.Migrate VM.Monitor VM.PowerMgmt SDN.Use User.Modify"
API Token
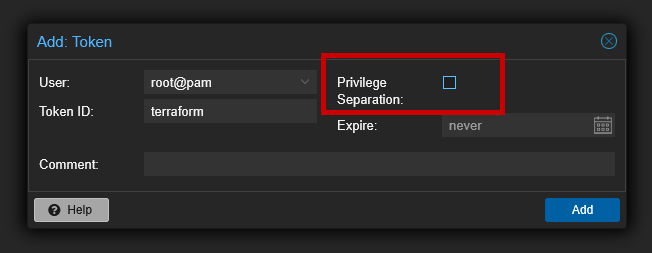
From the proxmox GUI, create an API Token for the terraform user.
note: ensure
privilege separationfor your API Token is disabled or terraform will error out later on:
📌 Installing Terraform on Linux
Terraform is primarily distributed as a .zip package containing a single executable, which can be extracted and placed anywhere on your Linux system.
For seamless integration with configuration management tools, Terraform also provides official package repositories for Debian-based and RHEL-based distributions. This enables installation using standard package managers like APT, Yum, or DNF, simplifying updates and dependency management.
Install Terraform in Debian, Ubuntu & Mint
1
2
3
4
wget -O- https://apt.releases.hashicorp.com/gpg | sudo gpg --dearmor -o /usr/share/keyrings/hashicorp-archive-keyring.gpg
echo "deb [signed-by=/usr/share/keyrings/hashicorp-archive-keyring.gpg] https://apt.releases.hashicorp.com $(lsb_release -cs) main" | sudo tee /etc/apt/sources.list.d/hashicorp.list
sudo apt update
sudo apt install terraform
Install Terraform in RHEL and CentOS
1
2
3
4
sudo yum install -y yum-utils
sudo yum-config-manager --add-repo https://rpm.releases.hashicorp.com/RHEL/hashicorp.repo
sudo yum update
sudo yum -y install terraform
Install Terraform in Fedora
1
2
3
4
sudo dnf install -y dnf-plugins-core
sudo dnf config-manager --add-repo https://rpm.releases.hashicorp.com/fedora/hashicorp.repo
sudo dnf update
sudo dnf -y install terraform
Now the installation can be verified by running a simple terraform version command.
1
terraform version
🛠️ Terraform Configuration
Terraform requires a provider and resource definitions. Below is a basic example of how to define LXC containers using Terraform.
📄 Terraform Configuration File (main.tf)
1
2
3
4
5
6
7
8
9
10
11
12
13
14
15
16
17
18
19
resource "proxmox_lxc" "basic" {
  target_node  = "pve"
  hostname     = "lxc-basic"
  ostemplate   = "local:vztmpl/ubuntu-20.04-standard_20.04-1_amd64.tar.gz"
  password     = "BasicLXCContainer"
  unprivileged = true

  // Terraform will crash without rootfs defined
  rootfs {
    storage = "local-zfs"
    size    = "8G"
  }

  network {
    name   = "eth0"
    bridge = "vmbr0"
    ip     = "dhcp"
  }
}
📌 Initializing Terraform
Run the following commands to initialize and apply the Terraform configuration:
1
2
terraform init
terraform apply -auto-approve
This will create the LXC container as defined in the main.tf file.
🎯 Managing LXC Containers with Terraform
Terraform allows easy management of LXC containers. Here are a few useful commands:
- Check Infrastructure State:
1
terraform show
- Update Configuration: Modify
main.tfand apply changes:1
terraform apply
- Destroy Containers:
1
terraform destroy -auto-approve
Deploying the proxmox container securly
Create a provider.tf file and install the below provider by running terraform init
1
2
3
4
5
6
7
8
9
10
11
12
13
14
15
16
17
18
19
20
21
22
23
24
25
terraform {
  required_providers {
    proxmox = {
      source  = "Telmate/proxmox"
      version = "3.0.1-rc6"
    }
  }
}


provider "proxmox" {
  pm_user              = var.proxmox_PM_USER
  pm_api_url           = var.proxmox_pm_api_url
  pm_api_token_id      = var.proxmox_PM_API_TOKEN_ID
  pm_api_token_secret  = var.proxmox_PM_API_TOKEN_SECRET
  pm_tls_insecure      = true
  pm_debug             = true
  pm_log_enable        = true
  pm_log_file          = "terraform-plugin-proxmox.log"
  pm_log_levels = {
    _default    = "debug"
    _capturelog = ""
  }
}
Create a vars.tf file and include your variables in it.
1
2
3
4
5
6
7
8
9
10
11
12
13
14
15
16
17
18
variable "proxmox_PM_USER" {
  type = string
}

variable "proxmox_pm_api_url" {
  type = string
}

variable "proxmox_PM_API_TOKEN_ID" {
  type = string
  sensitive = true
}

variable "proxmox_PM_API_TOKEN_SECRET" {
  type = string
  sensitive = true
}
Create a terraform.tfvars file and store your credentials in it. Remember to use gitignore if you are going to commit this to your public or private GitHub repo.
1
2
3
4
proxmox_PM_USER = "user@pve"
proxmox_pm_api_url = "https://$IP$:8006/api2/json"
proxmox_PM_API_TOKEN_ID = "user@pve!terraform"
proxmox_PM_API_TOKEN_SECRET = "abcedfg-b911-abcd-1234-791ebb4337f3"
Create a main.tf file, that is where I will a write a configuration rule that would provision two nodes in my proxmox home lab
1
2
3
4
5
6
7
8
9
10
11
12
13
14
15
16
17
18
19
20
21
22
23
24
25
resource "proxmox_lxc" "debain_lxc" {
  target_node  = "hulk"
  hostname     = "debian"
  ostemplate   = "nasp:vztmpl/debian-12-standard_12.7-1_amd64.tar.zst"
  unprivileged = true

  ssh_public_keys = <<-EOT
    ssh-rsa <public_key_1> user@example.com
    ssh-ed25519 <public_key_2> user@example.com
  EOT

  // Terraform will crash without rootfs defined
  rootfs {
    storage = "local-lvm"
    size    = "10G"
  }

  network {
    name   = "eth0"
    bridge = "vmbr0"
    ip     = "XX.XX.XX.XXX"
    ip6    = "auto"
  }
}
Then run
1
2
terraform plan
terraform apply
To clean the deployments
1
terraform destroy
✅ Troubleshooting Steps
1️⃣ Ensure You Are Using the Correct -var-file Argument Terraform does not automatically load custom *.tfvars files (except terraform.tfvars and *.auto.tfvars). You must specify it manually:
1
terraform plan -var-file="credentials.tfvars"
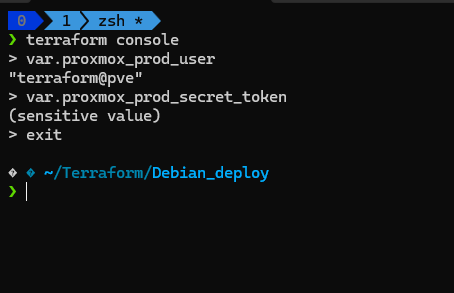
2️⃣ Validate Terraform’s Variable Recognition
Run the following command to confirm Terraform recognizes the variable:
1
2
terraform console
> var.proxmox_prod_secret_token
- If Terraform does not recognize it, the issue is with variable declaration or tfvars loading.
- If Terraform recognizes it, but terraform plan fails, check if the variable is being used correctly.
3️⃣ Recommended Ways to Load credentials.tfvars Automatically
- Use terraform.tfvars or *.auto.tfvars (Best Practice)
1️⃣ Terraform automatically loads:
- terraform.tfvars
- *.auto.tfvars (e.g., credentials.auto.tfvars)
2️⃣ Use an Environment Variable Set the variables in your shell instead of credentials.tfvars:
1
2
export TF_VAR_proxmox_prod_secret_token="your-secret-token"
terraform plan
This method avoids storing secrets in files.
🔥 Conclusion
By integrating Terraform with LXC, you can automate container provisioning efficiently. This approach enhances reproducibility, scalability, and version control for your infrastructure. Explore more Terraform configurations and enhance your containerized environment!
For a quick reference on Terraform commands, check out the Terraform Cheatsheet