PostgreSQL Replication on Debian

PostgreSQL is a powerful open-source relational database management system (RDBMS) that offers robust replication features. In this guide, we will set up master-slave replication on Debian, ensuring data is synchronized across servers for redundancy and high availability.
🛠️ Prerequisites
Before proceeding, ensure you have:
- ✅ Two Debian-based servers (Master & Slave)
- ✅ PostgreSQL installed on both servers
- ✅ SSH access with sudo privileges
- ✅ Proper network connectivity between the servers
- ✅ Static IP addresses assigned to both servers
📥 Step 1: Install PostgreSQL on Both Servers
Run the following commands on both Master and Slave servers:
1
sudo apt update && sudo apt install -y postgresql postgresql-contrib
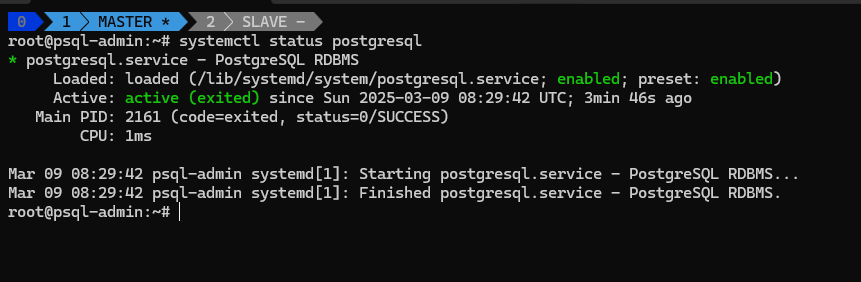
Once installed, verify the PostgreSQL service:
1
sudo systemctl status postgresql
🏗️ Step 2: Configure PostgreSQL on Master
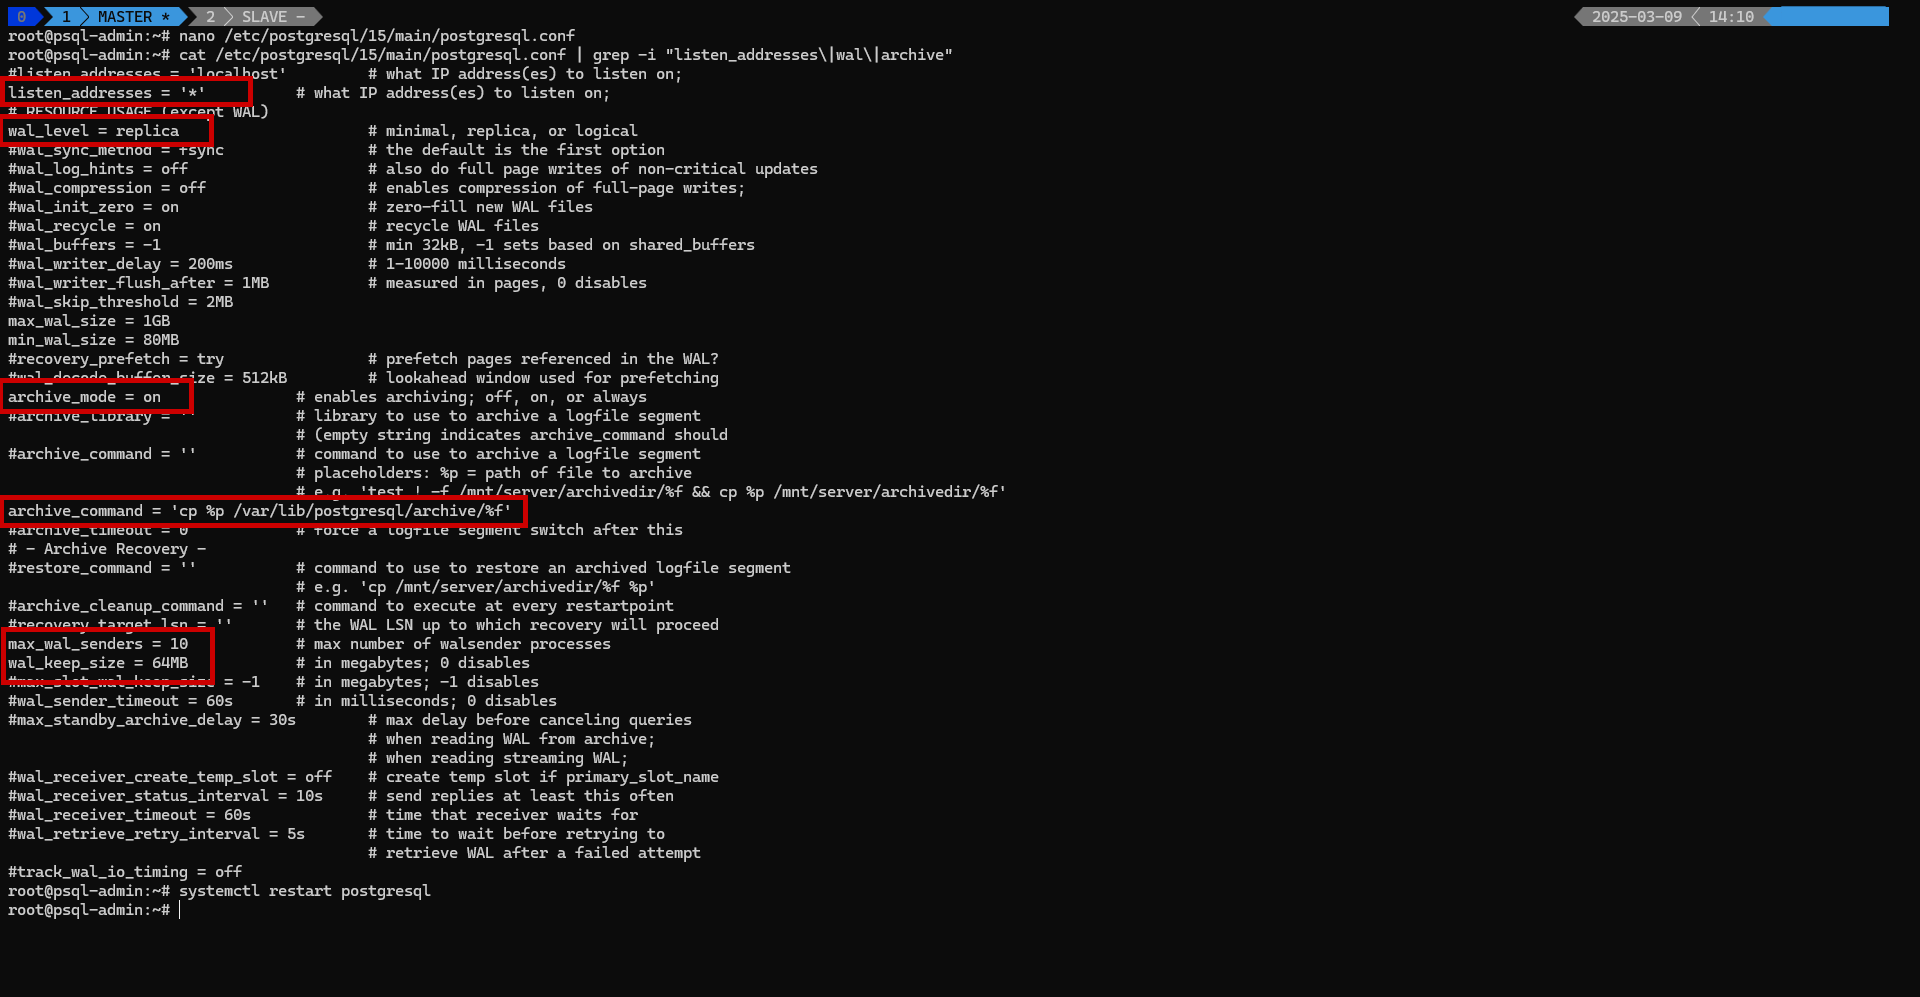
1️⃣ Edit postgresql.conf
Modify the PostgreSQL configuration file on the Master Server
where XX is the version number
1
sudo nano /etc/postgresql/XX/main/postgresql.conf
Update the following parameters:
1
2
3
4
5
6
7
listen_addresses = '*'  # Allows remote connections
wal_level = replica     # Enables replication
archive_mode = on       # Enables WAL archiving
archive_command = 'cp %p /var/lib/postgresql/archive/%f'
max_wal_senders = 10    # Defines maximum WAL senders
wal_keep_size = 64MB    # Retains WAL segments
hot_standby = on        # "off" disallows queries during recovery
Restart PostgreSQL to apply changes:
1
sudo systemctl restart postgresql
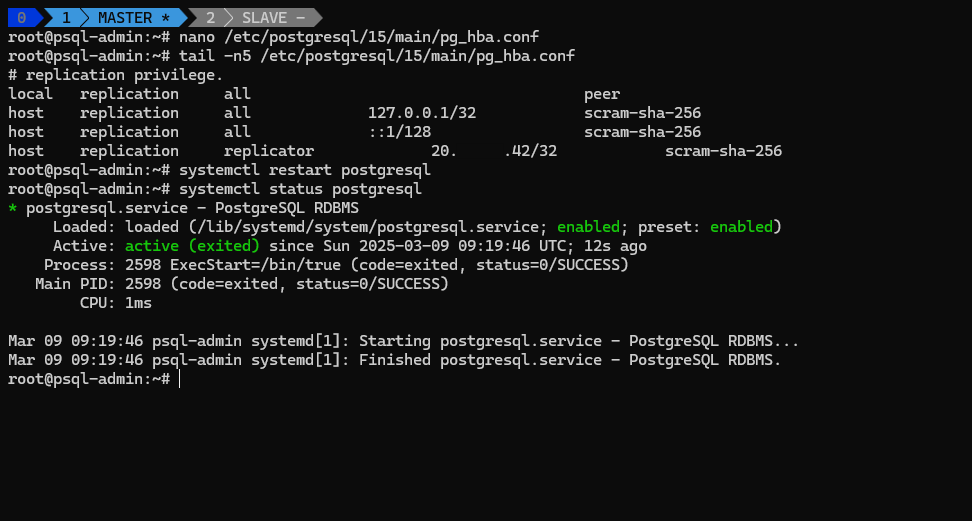
2️⃣ Configure pg_hba conf
The pg_hba.conf (PostgreSQL Host-Based Authentication) file is used to control client authentication in PostgreSQL. It defines who can connect, from where, and how they authenticate.
Allow replication connections from the Slave Server:
1
sudo nano /etc/postgresql/XX/main/pg_hba.conf
🔷 Types of Authentication in PostgreSQL
1️⃣ Trust
- Description: Allows connections without a password.
- Use Case: Only for local testing or environments with strict network isolation.
1
host all all 192.168.1.0/24 trust
2️⃣ MD5 (Hashed Password)
- Description: Uses MD5-hashed passwords for authentication.
- Use Case: Recommended for remote connections with password authentication.
1
host all all 192.168.1.0/24 md5
MD5 is considered weak by modern security standards. Use
scram-sha-256if possible.
3️⃣ Password (Plaintext Password)
- Description: Requires a plain-text password.
- Use Case: Not recommended for security reasons sends unencrypted passwords over the network (not secure).
1
host all all 192.168.1.0/24 password
4️⃣ Scram-SHA-256 (Secure Hashed Authentication)
- Description: Uses SHA-256 hashing (stronger than MD5).
- Use Case: Recommended for secure remote authentication.
1
host all all 192.168.1.0/24 scram-sha-256
✅ More secure than MD5 because it uses salted hashing and protects against brute-force attacks.
5️⃣ Peer (Linux User Mapping)
- Description: Uses the system’s OS user for authentication.
- Use Case: Secure local authentication on Unix/Linux.
- PostgreSQL checks if the OS username matches the DB username.
1
local all all peer
6️⃣ Ident (Remote OS User Mapping)
- Description: Uses an external Ident server to verify usernames.
- Use Case: Used when clients and DB servers are on the same trusted network.
- Maps OS users to database users.
1
host all all 192.168.1.0/24 ident
7️⃣ LDAP, Kerberos, PAM, SSPI, GSSAPI, Cert
- Use Case: Enterprise environments needing single sign-on (SSO) or centralized authentication.
1
2
host all all 192.168.1.0/24 ldap
host all all 192.168.1.0/24 gss
Which Authentication Method Should You Use?
| Method | Security | Best Use Case |
|---|---|---|
| Trust | ❌ Insecure | Local testing only |
| MD5 | 🟡 Moderate | Legacy remote authentication |
| Password | ❌ Weak | Avoid if possible |
| Scram-SHA-256 | ✅ Strong | Secure password authentication |
| Peer | ✅ Secure | Local authentication on Linux |
| Ident | 🟡 Moderate | Trusted networks with Ident server |
| LDAP, Kerberos, PAM | ✅ Enterprise-grade | Large organizations needing SSO |
Add the autheantication methhos depending upon your needs:
1
2
host   Rule   User       Address      authentication
host replication replicator <SLAVE_IP>/32 Scram-SHA-256
Restart PostgreSQL again:
1
sudo systemctl restart postgresql
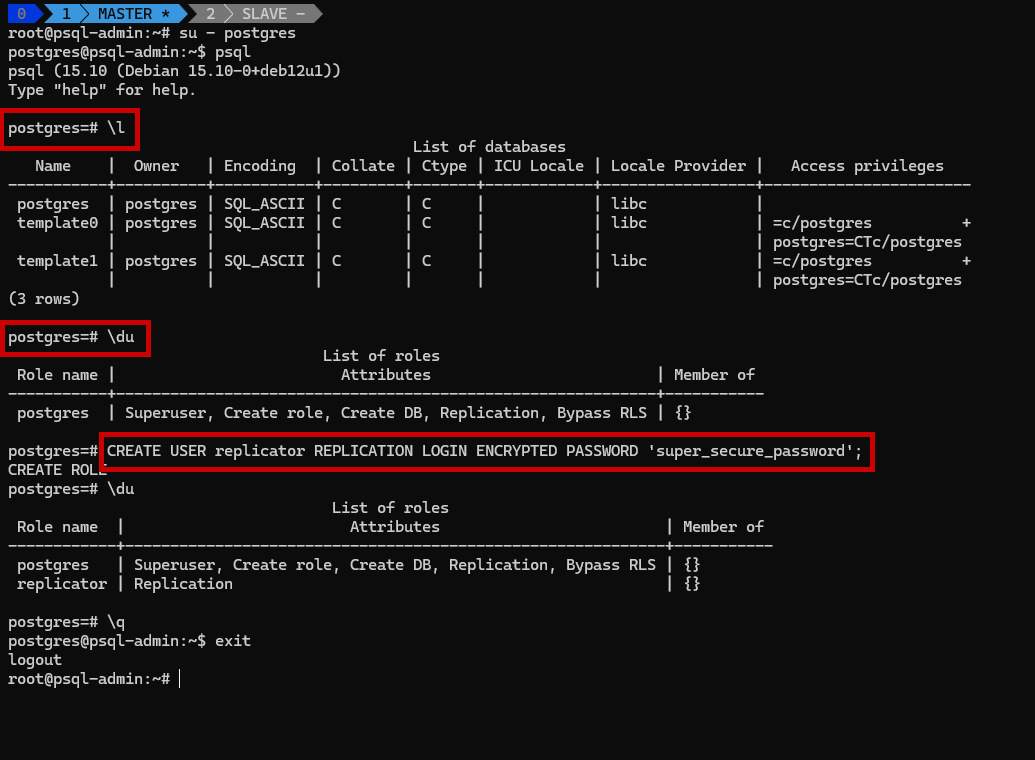
🔐 Step 3: Create a Replication User
Create a dedicated user for replication:
1
2
3
sudo -u postgres psql
    (OR)
su - postgres && psql
Within the PostgreSQL shell, execute:
1
CREATE USER replicator REPLICATION LOGIN ENCRYPTED PASSWORD 'super_secure_password';
Exit the PostgreSQL shell:
1
\q
📥 Step 4: Configure the Slave Server
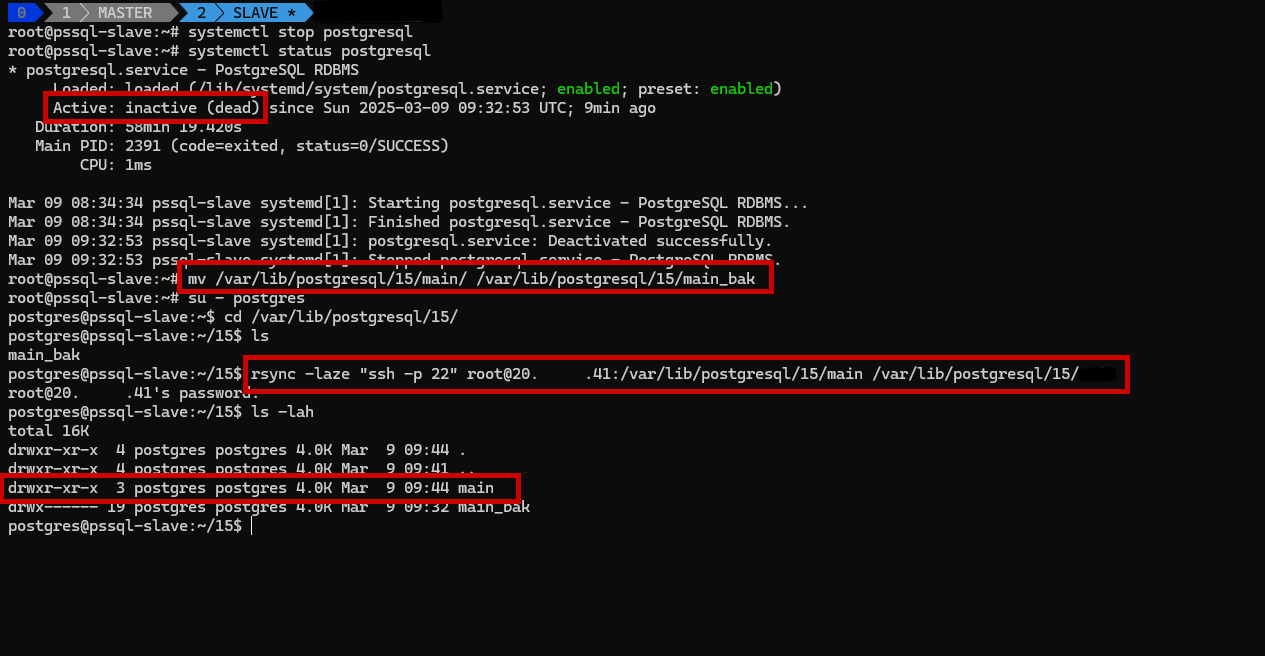
1️⃣ Stop PostgreSQL Service
Run the following command on the Slave Server:
1
sudo systemctl stop postgresql
2️⃣ Sync Data from Master
Clear the existing data directory:
where XX is the version number
1
2
3
sudo mv /var/lib/postgresql/XX/main /var/lib/postgresql/XX/main_bak
                      (or)
sudo rm -rf /var/lib/postgresql/XX/main/*
Sync data from the Master to the Slave using rsync:
1
2
3
4
sudo -u postgres rsync -av --progress -e "ssh -i ~/.ssh/id_rsa" postgres@<MASTER_IP>:/var/lib/postgresql/XX/main/ /var/lib/postgresql/XX/main/
        (OR)
su - postgres
rsync -laze "ssh -p 22" $USER$@$IP$:/var/lib/postgresql/15/main /var/lib/postgresql/15/
- As we have used the rsync whcih dont have Streaming WAL Files options. rsync is useful for initial database syncs or backups, especially for large datasets. However, it needs more manual steps and is not suited for continuous replication.
- For ongoing replication, Streaming WAL Files is the better choice as it provides real-time updates, is easy to set up, and requires less manual work. It’s ideal for high availability and scaling.
- Use Streaming WAL Files for regular replication and rsync for one-time tasks or custom backups.
1
2
pg_basebackup -h <master_ip> -U replicator -p 5432 -D /var/lib/postgresql/<version>/main -v -X stream -C -S slaveslot1 -R
SELECT * FROM pg_replication_slots;
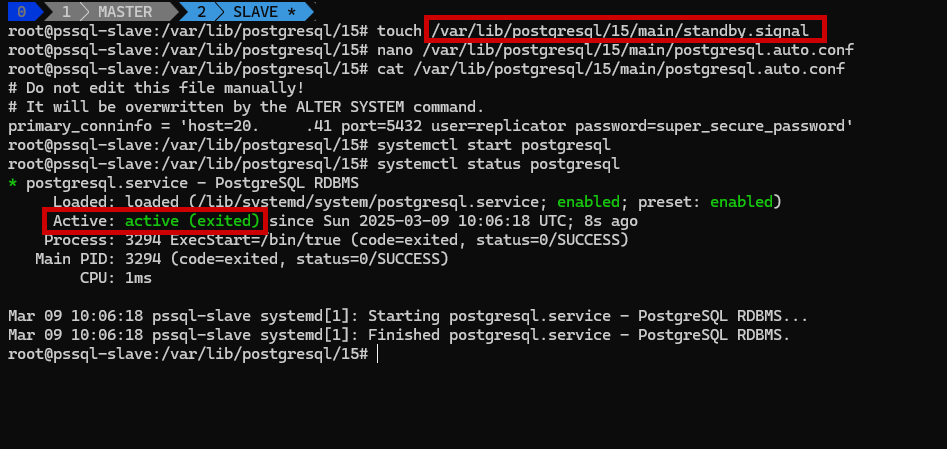
3️⃣ Create a Recovery Configuration File
Create a standby.signal file:
1
touch /var/lib/postgresql/XX/main/standby.signal
Create a postgresql.auto.conf file:
1
sudo nano /var/lib/postgresql/XX/main/postgresql.auto.conf
Add the following lines:
1
primary_conninfo = 'host=<MASTER_IP> port=5432 user=replicator password=super_secure_password'
4️⃣ Start PostgreSQL on Slave
Restart PostgreSQL on the Slave Server:
1
sudo systemctl start postgresql
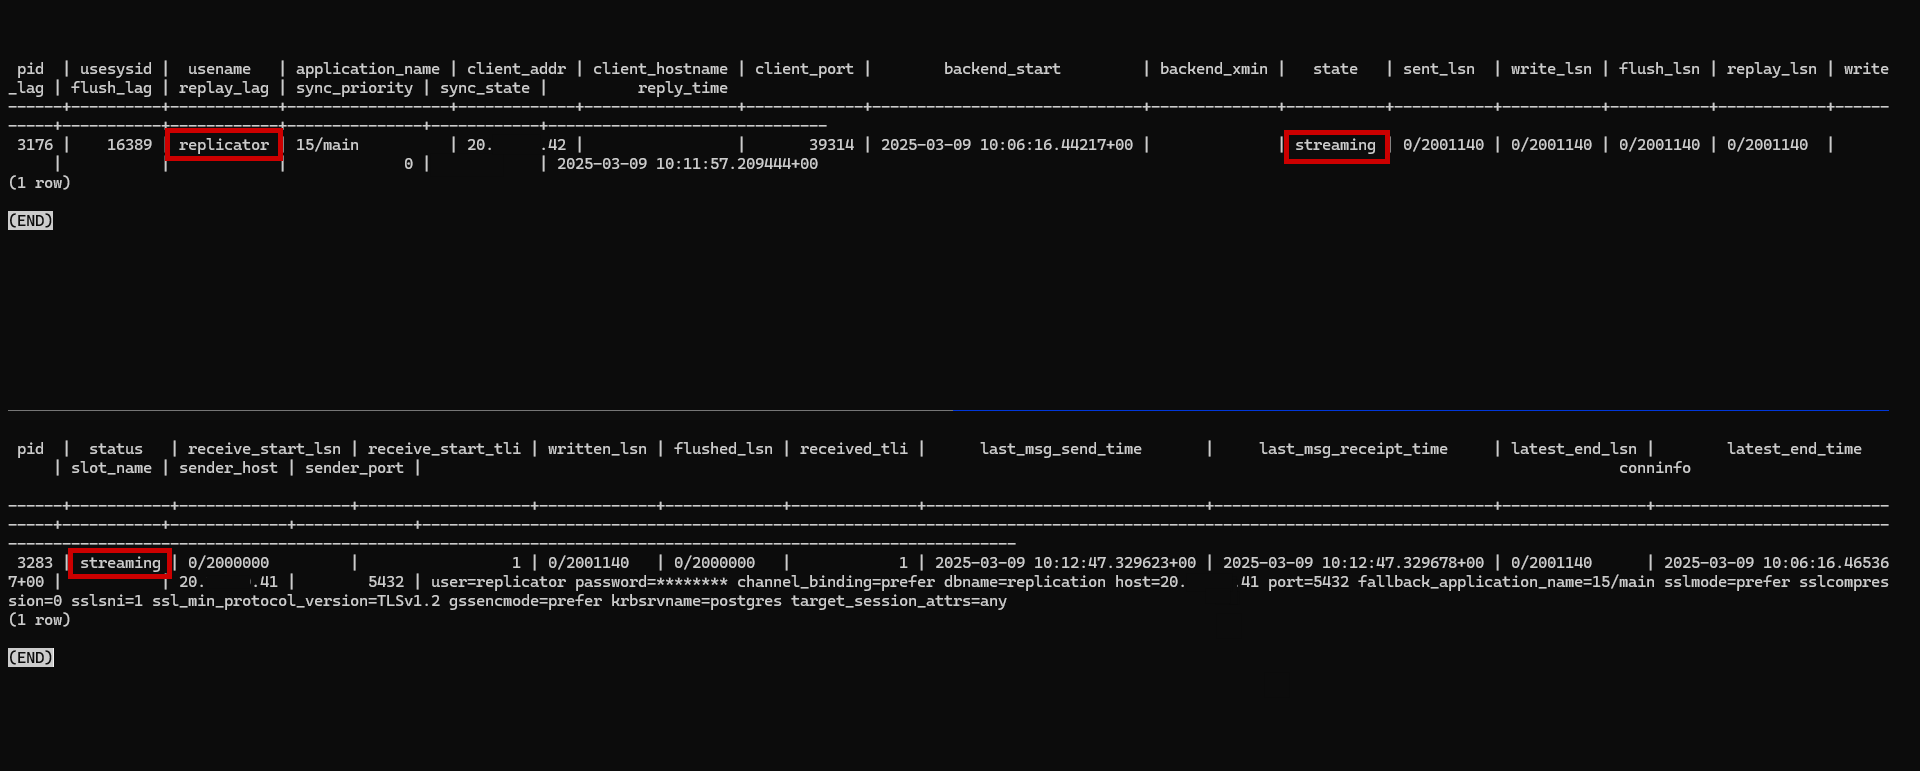
🛠️ Step 5: Verify Replication
On the Master Server, run:
1
sudo -u postgres psql -c "SELECT * FROM pg_stat_replication;"
On the Slave Server, run:
1
sudo -u postgres psql -c "SELECT * FROM pg_stat_wal_receiver;"
If replication is working, you should see active WAL sender and receiver processes.
🔥 Sync vs Async
Synchronous vs Asynchronous Replication in PostgreSQL
When setting up PostgreSQL replication, understanding the difference between synchronous and asynchronous replication is crucial. These two modes define how the primary (master) server and the standby (replica) server communicate and how transactions are managed across them.
📡 Synchronous Replication
In synchronous replication, the primary server waits for the standby server to acknowledge that it has received and written the WAL (Write-Ahead Log) data before the transaction is considered committed. This ensures data consistency across servers and reduces the risk of data loss, as both the primary and replica are in sync after each transaction.
- Pros:
- Data Consistency: Guarantees that both primary and replica are always in sync.
- Fault Tolerance: Lower risk of data loss in the event of a failure.
- Cons:
- Higher Latency: Transactions may experience a slight delay because the primary waits for the standby’s acknowledgment.
- Performance Impact: Can slow down transactions, especially when the replica is located far away or is slower.
Use Case: Synchronous replication is ideal for mission-critical applications where data consistency and high availability are more important than performance.
📡 Asynchronous Replication
In asynchronous replication, the primary server does not wait for the standby server to acknowledge the receipt of WAL data. The primary server commits the transaction immediately and continues without waiting for the replica to catch up. This results in faster transaction processing but introduces a risk of data loss if the primary server fails before the replica has received and written the data.
- Pros:
- Lower Latency: Transactions are faster since the primary doesn’t wait for the replica.
- Better Performance: Especially beneficial when the replica is located remotely or when replication lag isn’t a major concern.
- Cons:
- Risk of Data Loss: If the primary fails, recent transactions may not have been replicated, leading to data inconsistency.
- Replication Lag: The replica may not always be up-to-date with the primary server.
Use Case: Asynchronous replication is suitable for systems where performance is critical, and slight data inconsistency is acceptable, such as read-heavy applications or when using geographically distributed systems.
The choice between synchronous and asynchronous replication depends on the needs of your application. If data integrity and consistency are paramount, then synchronous replication is the way to go. However, if performance and low latency are more important, asynchronous replication may be better suited for your use case.
Edit the PostgreSQL Configuration on the Primary (Master) Server:
1
2
3
4
sudo nano /etc/postgresql/<version>/main/postgresql.conf
synchronous_standby_names = '*'
sudo systemctl reload postgresql
sudo -u postgres psql -c "SHOW synchronous_standby_names;"

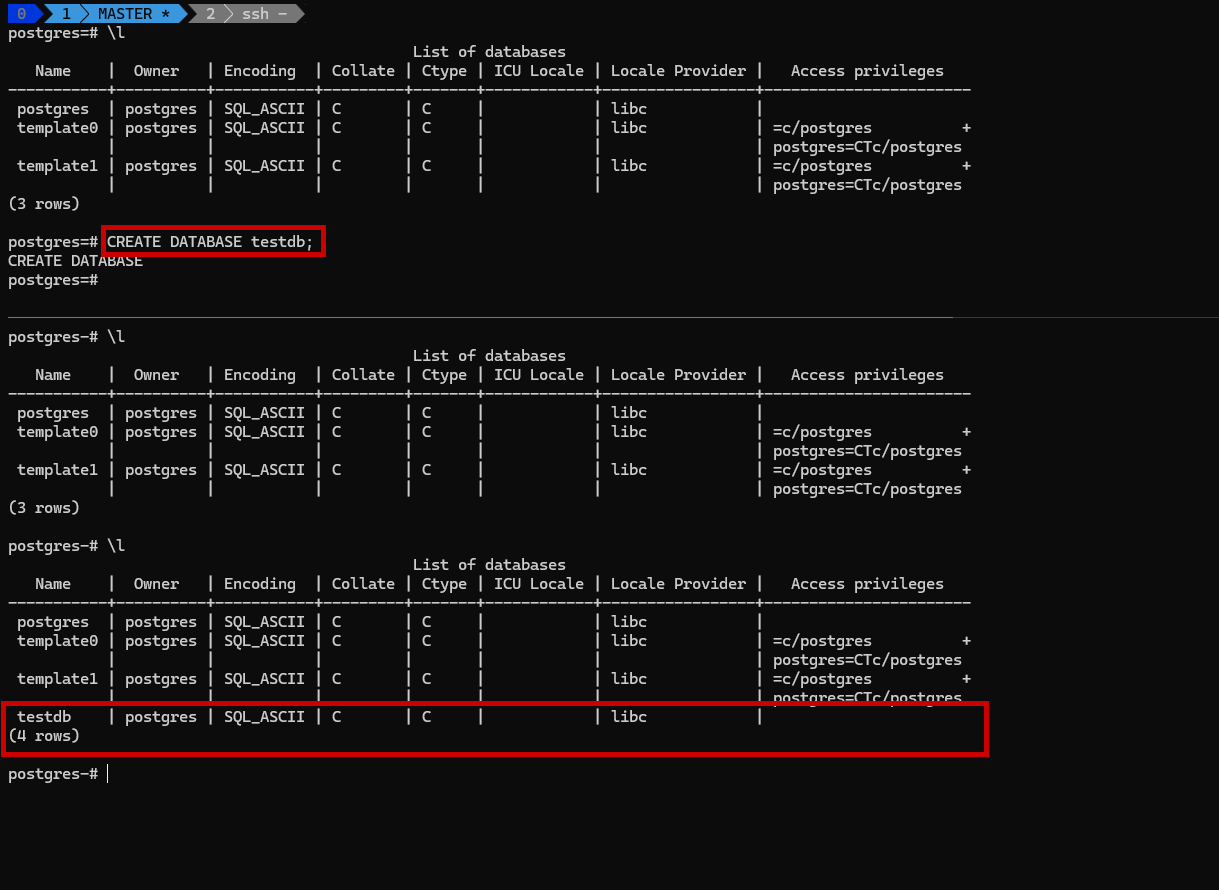
🔄 Testing Replication
To confirm replication is working:
- Create a test database on Master:
1
CREATE DATABASE testdb; - Check if it appears on Slave:
1
\l
🔷 Conclusion
You have successfully configured PostgreSQL Master-Slave replication on Debian! This setup ensures redundancy, improves availability, and enhances disaster recovery. You can now further optimize this setup by implementing failover mechanisms and monitoring solutions.
For a quick reference on PostgreSQL commands, check out the PostgreSQL Replication Cheatsheet
💡 Bonus Tip: Consider using tools like Patroni or pgpool-II for automatic failover.
For further insights, stay tuned for more PostgreSQL tutorials and best practices!