Jenkins kickstart

🧰 What is Jenkins?
Jenkins is an open-source automation server written in Java. It helps automate the parts of software development related to building, testing, and deploying, facilitating continuous integration (CI) and continuous delivery (CD).
Originally developed as Hudson, Jenkins has grown to support a vast plugin ecosystem and works well with all major tools in the DevOps ecosystem including Git, Docker, Kubernetes, Ansible, and many more.
🌐 Jenkins in the DevOps Lifecycle
In the DevOps pipeline, Jenkins plays a central role by automating:
- Code Integration (CI)
- Testing (unit/integration)
- Building artifacts
- Deployment (CD)
- Monitoring and post-deployment scripts
This automation reduces manual effort, increases speed, and improves consistency across development and production environments.
Example: A developer pushes code to GitHub → Jenkins automatically triggers a build → runs tests → deploys to staging → notifies via Slack.
⏰ Jenkins Triggers Explained
Triggers are ways to automate builds based on events. Here’s a detailed guide on how to set up different types of triggers in Jenkins:
✅ 1. Trigger Builds Remotely (e.g., from scripts)
This option allows you to trigger builds using a simple HTTP request:
- In your job configuration, select “Trigger builds remotely”
- Provide an authentication token (e.g.,
token1) - this should be unique - Jenkins will provide a URL in this format:
JENKINS_URL/job/jobname/build?token=TOKEN_NAME - Replace with your actual values:
- Example:
http://<server_ip>:8080/job/job4/build?token=token1
- Example:
- You can trigger the build by:
- Opening this URL in any browser
- Using curl with API token:
curl -l -u admin:<apiToken> http://<publicIP>:8080/job/CloneRepo/build?token=token1
✅ 2. GitHub Hook Trigger for GITScm Polling
Automatically trigger builds when changes are pushed to GitHub:
- In Jenkins job configuration, select “GitHub hook trigger for GITScm polling”
- Save the job configuration
- Go to your GitHub repository settings
- Select “Webhooks” on the left side
- Delete any existing webhooks if necessary
- Click “Create webhook” on the right side
- Configure the webhook:
- Payload URL:
http://your-jenkins-url/github-webhook/(e.g.,http://<server_ip>:8080/github-webhook/) - Content type: Select
application/json - Secret: No value needed
- For “Which events would you like to trigger this webhook?”, select “Just the push event”
- Ensure “Active” is selected
- Payload URL:
- Click “Add webhook”
Now, whenever you make changes to your repository, Jenkins will automatically trigger a new build.
✅ 3. Build Periodically (Cron Jobs)
Schedule builds to run at specific times:
- In job configuration, select “Build periodically”
- Enter a cron expression (e.g.,
*/2 * * * *to run every 2 minutes) - Save the configuration
Jenkins will automatically generate builds according to the schedule you specified.
✅ 4. Poll SCM
This option checks for changes in your source code repository at regular intervals:
- Configure your job with source code management (e.g., Git)
- Example repository:
https://github.com/githubusername/repo
- Example repository:
- Select “Poll SCM” under Build Triggers
- Enter a cron expression (e.g.,
* * * * *to check every minute)
Unlike “Build periodically”, this will only generate a build when changes are detected in the repository.
✅ 5. Upstream/Downstream Triggers
Chain jobs together:
- Upstream triggers downstream once completed
- Useful in multi-stage pipelines
1
build job: 'downstream-job-name'
🧪 Parameters in Jenkins Jobs
Parameters let you customize job behavior during runtime.
Freestyle Parameters
- Go to Configure → This project is parameterized
- Add parameters like:
- String Parameter (e.g., ENVIRONMENT = staging)
- Choice Parameter (e.g., BRANCH = dev/test/prod)
1
2
#!/bin/bash
echo "Deploying to $ENVIRONMENT"
You can also reference parameters in Pipeline scripts:
1
2
3
4
5
6
7
8
9
10
11
12
13
14
pipeline {
    agent any

    parameters {
        string(name: 'USERNAME', defaultValue: 'admin')
    }
    stages {
        stage('Echo Username') {
            steps {
                echo "Hello ${params.USERNAME}"
            }
        }
    }
}
parameters in Pipeline
1
2
3
4
5
6
7
8
9
10
11
12
13
14
15
16
17
18
19
20
21
22
23
24
25
26
27
28
29
30
31
32
33
34
35
36
37
pipeline {
    agent any

    parameters {
        string(name: 'PERSON', defaultValue: 'Mr Jenkins', description: 'Who should I say hello to?')
        text(name: 'BIOGRAPHY', defaultValue: '', description: 'Enter some information about the person')
        booleanParam(name: 'TOGGLE', defaultValue: true, description: 'Toggle this value')
        choice(name: 'CHOICE', choices: ['One', 'Two', 'Three'], description: 'Pick something')
        password(name: 'PASSWORD', defaultValue: 'SECRET', description: 'Enter a password')

        // Additional parameters
        run(name: 'RUN_PARAM', description: 'Select a build to use')  // Select a build from another job
        file(name: 'FILE_PARAM', description: 'Upload a file')       // Upload a file
        credentials(name: 'CREDENTIALS_PARAM', description: 'Select credentials') // Select Jenkins stored credentials
        booleanParam(name: 'FLAG', defaultValue: false, description: 'A simple flag')
        string(name: 'EMAIL', defaultValue: '', description: 'User email address')
        text(name: 'NOTES', defaultValue: '', description: 'Additional notes')
    }

    stages {
        stage('Example') {
            steps {
                echo "Hello ${params.PERSON}"
                echo "Biography: ${params.BIOGRAPHY}"
                echo "Toggle: ${params.TOGGLE}"
                echo "Choice: ${params.CHOICE}"
                echo "Password: ${params.PASSWORD}"
                echo "Run param: ${params.RUN_PARAM}"
                echo "File param: ${params.FILE_PARAM}"
                echo "Credentials param: ${params.CREDENTIALS_PARAM}"
                echo "Flag: ${params.FLAG}"
                echo "Email: ${params.EMAIL}"
                echo "Notes: ${params.NOTES}"
            }
        }
    }
}
🗺️ Groovy Map Variables
Map variables are useful for structured data or lookups inside pipelines.
1
2
3
4
5
6
7
8
9
10
11
12
13
14
15
16
17
18
19
20
21
22
23
// Script 1: Example Map Usage
pipeline {
    agent any

    stages {
        stage('Example') {
            steps {
                script {
                    def myMap = [
                        name: 'Alice',
                        city: 'New York',
                        job: 'Developer'
                    ]

                    echo "Name: ${myMap.name}"
                    echo "City: ${myMap['city']}"
                    echo "Job: ${myMap.job}"
                }
            }
        }
    }
}
1
2
3
4
5
6
7
8
9
10
11
12
13
14
15
16
17
18
19
20
21
22
// Script 2: Deploy with Config Map
def config = [
  dev : "10.0.0.1",
  prod: "10.0.0.2"
]

pipeline {
    agent any
    parameters {
        choice(name: 'ENV', choices: ['dev', 'prod'], description: 'Select Environment')
    }
    stages {
        stage('Deploy') {
            steps {
                script {
                    def selected_ip = config[params.ENV]
                    echo "Deploying to IP: ${selected_ip}"
                }
            }
        }
    }
}
Pipeline Project
Jenkins is a core DevOps tool that automates the CI/CD lifecycle. Whether you’re deploying a basic Freestyle job or a full-blown multibranch pipeline, Jenkins supports it all.
Mastering Jenkins triggers, parameters, and build types will give you a significant advantage in automating your delivery processes.
1
2
3
4
5
6
7
8
9
10
11
12
13
14
15
16
17
18
19
20
21
pipeline {
    agent any
    stages {
        stage('Example') {
            steps {
                echo 'Hello, Jenkins!'
            }
            post {
                always {
                    echo 'This will always run after the stage.'
                }
                success {
                    echo 'This runs only if the stage succeeds.'
                }
                failure {
                    echo 'This runs only if the stage fails.'
                }
            }
        }
    }
}
🔌 Jenkins Plugins
Jenkins’ power comes from its extensive plugin ecosystem. Here’s how to install and use plugins effectively.
There are two ways to install Jenkins plugins:
Method 1: Through the Jenkins UI
- Navigate to Manage Jenkins → Manage Plugins
- Click on the Available tab
- Use the search box to find your desired plugin
- Check the box next to the plugin name
- Click Install without restart or Download now and install after restart
- If needed, restart Jenkins after installation
Method 2: Using Jenkins CLI
1
java -jar jenkins-cli.jar -s http://your-jenkins-url/ install-plugin plugin-name
Warnings Plugin Installation
The Warnings Next Generation plugin is a powerful tool for static code analysis that can parse and visualize warnings from various tools.
- Go to Manage Jenkins → Manage Plugins → Available
- Search for “Warnings Next Generation”
- Check the box and click Install without restart
Maven with Warnings Plugin
Here’s an example of integrating the Warnings plugin in a pipeline:
1
2
3
4
5
6
7
8
9
10
11
12
13
14
15
16
17
18
19
20
21
22
23
24
25
26
27
28
29
30
31
32
33
34
35
36
37
38
39
40
pipeline {
    agent any

    stages {
        stage('Checkout') {
            steps {
                checkout scm
            }
        }

        stage('Build') {
            steps {
                sh 'mvn clean compile'
            }
        }

        stage('Static Analysis') {
            steps {
                // Run static analysis tools
                sh 'mvn checkstyle:checkstyle pmd:pmd spotbugs:spotbugs'
            }
            post {
                always {
                    // Process the results using Warnings NG plugin
                    recordIssues(
                        tools: [
                            checkStyle(pattern: '**/checkstyle-result.xml'),
                            pmdParser(pattern: '**/pmd.xml'),
                            spotBugs(pattern: '**/spotbugsXml.xml')
                        ],
                        qualityGates: [[threshold: 1, type: 'TOTAL', unstable: true]],
                        healthy: 10,
                        unhealthy: 100,
                        minimumSeverity: 'HIGH'
                    )
                }
            }
        }
    }
}
Python with Warnings Plugin
1
2
3
4
5
6
7
8
9
10
11
12
13
14
15
16
17
18
19
20
21
22
23
24
25
26
27
28
29
30
31
32
33
34
35
36
37
38
39
40
41
42
43
44
45
46
47
pipeline {
    agent any

    stages {
        stage('Checkout') {
            steps {
                checkout scm
            }
        }

        stage('Setup Python') {
            steps {
                sh 'pip install -r requirements.txt'
                sh 'pip install pylint flake8'
            }
        }

        stage('Static Analysis') {
            steps {
                sh 'pylint --output-format=parseable --reports=no *.py > pylint.log || true'
                sh 'flake8 --format=pylint *.py > flake8.log || true'
            }
            post {
                always {
                    recordIssues(
                        tools: [
                            pyLint(pattern: 'pylint.log'),
                            flake8(pattern: 'flake8.log')
                        ],
                        qualityGates: [[threshold: 10, type: 'TOTAL', unstable: true]]
                    )
                }
            }
        }

        stage('Test') {
            steps {
                sh 'python -m pytest --junitxml=test-results.xml'
            }
            post {
                always {
                    junit 'test-results.xml'
                }
            }
        }
    }
}
🔄 Static vs. Dynamic Jenkins Agents
| Feature/Aspect | Static Agents | Dynamic Agents |
|---|---|---|
| Availability | Always connected and available | Provisioned on-demand, terminated after use |
| Startup Time | No startup delay | Slight delay due to provisioning |
| Resource Usage | Less efficient – idle resources | More efficient – uses resources only when needed |
| Environment Consistency | Can drift over time | Fresh and consistent for each build |
| Scalability | Limited – manual effort needed | High – can scale automatically based on demand |
| Maintenance | Manual setup and maintenance required | Requires infrastructure for provisioning (e.g., cloud, Kubernetes) |
| Troubleshooting | Easier – persistent environment | Harder – ephemeral environments |
| Use Case Fit | Predictable workloads, complex setup, specialized hardware | Varying workloads, cloud-native environments, CI/CD pipelines |
🐳 Jenkins Pipelines with Docker Agent
Docker agents allow you to run your pipeline steps inside Docker containers, providing isolated and consistent environments for your builds.
Setting Up Docker Integration
Prerequisites
- Connect to your Jenkins server via terminal:
1
2
sudo su -
apt-get update && apt-get install docker.io
- Install the Docker Pipeline plugin:
- Navigate to Manage Jenkins → Manage Plugins → Available
- Search for “Docker Pipeline”
- Select it and click Install
- After installation, restart Jenkins:
1
systemctl restart jenkins
- Configure Docker permissions:
1
2
3
4
# Add jenkins user to docker group
usermod -aG docker jenkins
# Restart Jenkins service
systemctl restart jenkins
Maven Docker Agent
1
2
3
4
5
6
7
8
9
10
11
12
13
14
15
16
17
18
19
20
21
22
23
24
25
26
27
pipeline {
    agent {
        docker {
            image 'maven:3.8.6-openjdk-11'
            args '-v $HOME/.m2:/root/.m2'
        }
    }

    stages {
        stage('Build') {
            steps {
                sh 'mvn -B clean package'
            }
        }

        stage('Test') {
            steps {
                sh 'mvn test'
            }
            post {
                always {
                    junit '**/target/surefire-reports/TEST-*.xml'
                }
            }
        }
    }
}
Python Docker Agent
1
2
3
4
5
6
7
8
9
10
11
12
13
14
15
16
17
18
19
20
21
22
23
24
25
26
27
28
29
30
31
32
pipeline {
    agent {
        docker {
            image 'python:3.9'
            args '-v ${WORKSPACE}:/app -w /app'
        }
    }

    stages {
        stage('Setup') {
            steps {
                sh 'pip install -r requirements.txt'
                sh 'pip install pytest pytest-cov'
            }
        }

        stage('Test') {
            steps {
                sh 'python -m pytest --cov=. --cov-report=xml'
            }
            post {
                always {
                    junit 'test-results.xml'
                    recordCoverage(
                        tools: [[parser: 'COBERTURA', pattern: 'coverage.xml']],
                        qualityGates: [[threshold: 80, metric: 'LINE', unstable: true]]
                    )
                }
            }
        }
    }
}
Jenkins Pipelines with windows Agent
Follow these easy steps to add and configure a Jenkins slave (agent) on a Windows machine:
Step 1: Configure Agent on Jenkins Master
- Go to Manage Jenkins → Nodes → New Node
- Enter a Node name, select Permanent Agent, click Create
- Fill in:
- Remote root directory → Path to an empty folder on agent machine (e.g., C:\Jenkins)
- Label → Optional
- Launch method → Launch agent by connecting it to the controller
- Availability → Keep this agent online as much as possible
- save
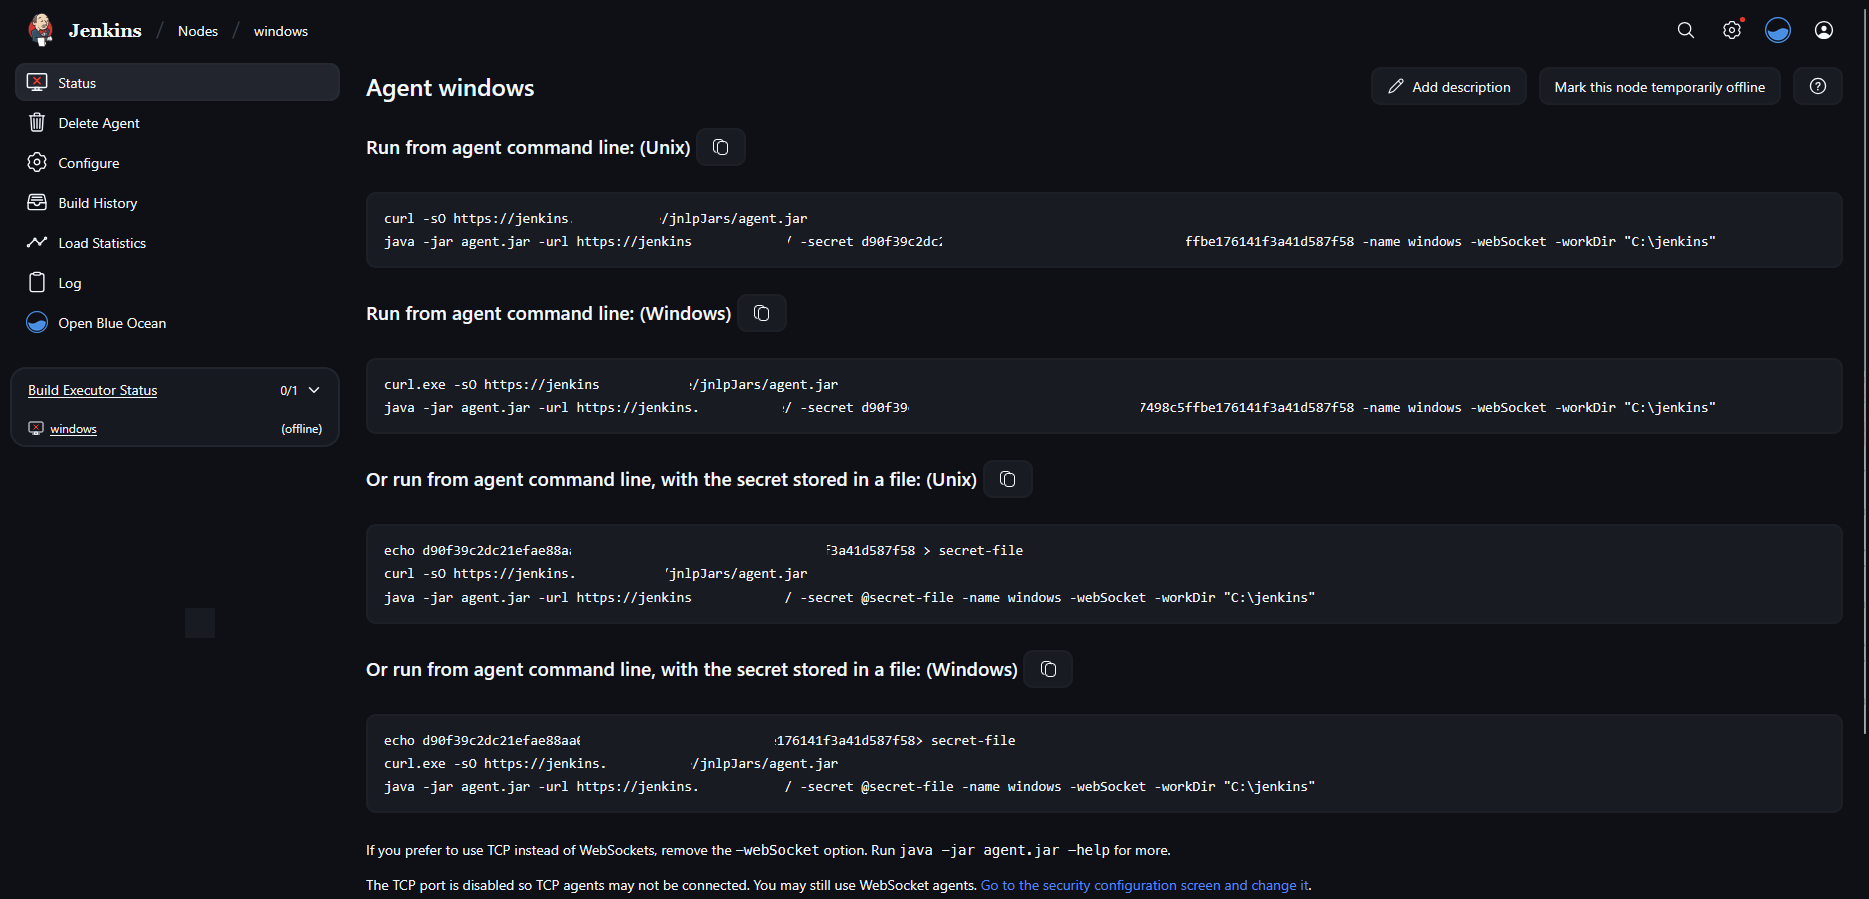
Step 2: Connect Agent from Windows Machine
- Open the newly created node page → Copy the two Windows command lines under “Run from agent command line”
- Open CMD as Administrator and run the command
1
cd C:\Jenkins
Paste and execute both commands
- This will download agent.jar and connect the agent (temporarily)
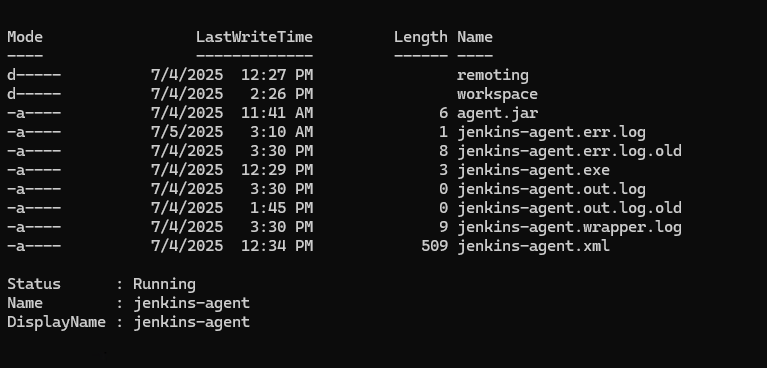
Step 3: Run Agent as a Windows Service
- Download and setup WinSW
- Download WinSW-x64.exe → Rename to jenkins-agent.exe
- Download sample jenkins.xml → Rename to jenkins-agent.xml
- Place both in the Jenkins folder (path from step 4)
- Edit jenkins-agent.xml:
- Set
and to jenkins-agent - Replace
content with the second command (excluding java)
- Set
- In CMD (as Admin), run:
1
2
3
4
cd C:\Jenkins
jenkins-agent.exe install
Get-Service jenkins-agent
Start-Service jenkins-agent
Docker Multi-Stage Example
1
2
3
4
5
6
7
8
9
10
11
12
13
14
15
16
17
18
19
20
21
22
23
24
25
26
27
28
29
30
31
32
33
34
35
36
37
38
39
40
41
42
pipeline {
    agent none

    stages {
        stage('Build') {
            agent {
                docker {
                    image 'node:14'
                    args '-v ${WORKSPACE}:/app -w /app'
                }
            }
            steps {
                sh 'npm install'
                sh 'npm run build'
            }
        }

        stage('Test') {
            agent {
                docker {
                    image 'node:14'
                    args '-v ${WORKSPACE}:/app -w /app'
                }
            }
            steps {
                sh 'npm test'
            }
        }

        stage('Deploy') {
            agent {
                docker {
                    image 'amazon/aws-cli:latest'
                    args '--entrypoint=""'
                }
            }
            steps {
                sh 'aws s3 sync ./build s3://my-bucket/'
            }
        }
    }
}
📢 Jenkins Notifications
Notifications keep your team informed about build and deployment status. Here’s how to set up different notification systems.
Slack Integration
Installing Slack Plugin
- Go to Manage Jenkins → Manage Plugins → Available
- Search for “Slack Notification”
- Install the plugin and restart Jenkins if needed
Configuring Slack Integration
- Create a Slack app and get the token:
- Go to https://api.slack.com/apps
- Click Create New App → From scratch
- Name your app (e.g., “Jenkins Notifications”) and select your workspace
- Navigate to OAuth & Permissions → Bot Token Scopes
- Add scopes:
chat:write,files:write,channels:read - Install the app to your workspace
- Copy the Bot User OAuth Token
- Configure Jenkins:
- Go to Manage Jenkins → Configure System
- Find the Slack section
- Enter your Workspace name
- Add credentials (Secret text) with the Bot User OAuth Token
- Specify default channel (e.g.,
#jenkins-builds) - Test the connection
Using Slack in Pipeline
1
2
3
4
5
6
7
8
9
10
11
12
13
14
15
16
17
18
19
20
21
22
23
24
25
26
27
28
29
30
31
32
pipeline {
    agent any

    stages {
        stage('Build') {
            steps {
                echo 'Building...'
            }
        }
    }

    post {
        success {
            slackSend(
                color: 'good',
                message: "✅ Build Successful: Job '${env.JOB_NAME} [${env.BUILD_NUMBER}]' (${env.BUILD_URL})"
            )
        }
        failure {
            slackSend(
                color: 'danger',
                message: "❌ Build Failed: Job '${env.JOB_NAME} [${env.BUILD_NUMBER}]' (${env.BUILD_URL})"
            )
        }
        unstable {
            slackSend(
                color: 'warning',
                message: "⚠️ Build Unstable: Job '${env.JOB_NAME} [${env.BUILD_NUMBER}]' (${env.BUILD_URL})"
            )
        }
    }
}
Discord Integration
Installing Discord Plugin
- Go to Manage Jenkins → Manage Plugins → Available
- Search for “Discord Notifier”
- Install the plugin and restart Jenkins if needed
Configuring Discord Integration
- Create a Discord webhook:
- Open Discord and go to the server where you want to receive notifications
- Go to Server Settings → Integrations → Webhooks
- Click New Webhook
- Name it (e.g., “Jenkins Notifications”)
- Select the channel for notifications
- Copy the Webhook URL
- Configure Jenkins:
- Go to Manage Jenkins → Configure System
- Find the Discord Notifier section
- Enter the Webhook URL
- Configure other settings as needed
Using Discord in Pipeline
1
2
3
4
5
6
7
8
9
10
11
12
13
14
15
16
17
18
19
20
21
22
23
pipeline {
    agent any

    stages {
        stage('Build') {
            steps {
                echo 'Building...'
            }
        }
    }

    post {
        always {
            discordSend(
                description: "Jenkins Build ${currentBuild.currentResult}",
                link: env.BUILD_URL,
                result: currentBuild.currentResult,
                title: "${env.JOB_NAME} #${env.BUILD_NUMBER}",
                webhookURL: 'https://discord.com/api/webhooks/your-webhook-url'
            )
        }
    }
}
🔍 SonarQube Integration with Jenkins
SonarQube provides continuous code quality inspection. Here’s how to integrate it with Jenkins.
Setting Up SonarQube
Installing SonarQube
- Using Docker (recommended):
1
docker run -d --name sonarqube -p 9000:9000 sonarqube:latest
- Access SonarQube at
http://your-server:9000- Default credentials: admin/admin
- You’ll be prompted to change the password on first login
Creating a SonarQube Project and Token
- Log in to SonarQube
- Go to Administration → Projects → Create Project
- Enter a project key and name
- Go to Administration → Security → Users
- Click on your username → Tokens → Generate
- Name your token (e.g., “jenkins-integration”) and click Generate
- Copy the generated token (you won’t be able to see it again)
Jenkins Configuration
Installing SonarQube Scanner Plugin
- Go to Manage Jenkins → Manage Plugins → Available
- Search for “SonarQube Scanner”
- Install the plugin and restart Jenkins if needed
Configuring SonarQube in Jenkins
- Go to Manage Jenkins → Configure System
- Find the SonarQube servers section
- Click Add SonarQube
- Enter a name (e.g., “SonarQube”)
- Enter the SonarQube URL (e.g.,
http://your-server:9000) - Add the SonarQube authentication token as a Jenkins credential
- Select the credential in the dropdown
- Save the configuration
Adding SonarQube Scanner Tool
- Go to Manage Jenkins → Global Tool Configuration
- Find the SonarQube Scanner section
- Click Add SonarQube Scanner
- Enter a name (e.g., “SonarQube Scanner”)
- Choose Install automatically or specify the path to your installation
- Save the configuration
SonarQube in maven
1
2
3
4
5
6
7
8
9
10
11
12
13
14
15
16
17
18
19
20
21
22
23
24
25
26
27
28
29
30
31
32
33
34
35
36
37
38
pipeline {
    agent any

    tools {
        maven 'Maven 3.8.6'
        jdk 'JDK 11'
    }

    stages {
        stage('Checkout') {
            steps {
                checkout scm
            }
        }

        stage('Build') {
            steps {
                sh 'mvn clean package'
            }
        }

        stage('SonarQube Analysis') {
            steps {
                withSonarQubeEnv('SonarQube') {
                    sh 'mvn sonar:sonar -Dsonar.projectKey=my-project -Dsonar.projectName="My Project"'
                }
            }
        }

        stage('Quality Gate') {
            steps {
                timeout(time: 1, unit: 'HOURS') {
                    waitForQualityGate abortPipeline: true
                }
            }
        }
    }
}
SonarQube with Python
1
2
3
4
5
6
7
8
9
10
11
12
13
14
15
16
17
18
19
20
21
22
23
24
25
26
27
28
29
30
31
32
33
34
pipeline {
    agent any

    stages {
        stage('Checkout') {
            steps {
                checkout scm
            }
        }

        stage('SonarQube Analysis') {
            steps {
                withSonarQubeEnv('SonarQube') {
                    sh '''
                        sonar-scanner \
                        -Dsonar.projectKey=python-project \
                        -Dsonar.projectName="Python Project" \
                        -Dsonar.sources=. \
                        -Dsonar.python.coverage.reportPaths=coverage.xml \
                        -Dsonar.python.xunit.reportPath=test-results.xml
                    '''
                }
            }
        }

        stage('Quality Gate') {
            steps {
                timeout(time: 1, unit: 'HOURS') {
                    waitForQualityGate abortPipeline: true
                }
            }
        }
    }
}
🔄 Backup of Jenkins Server
Regular backups are essential for Jenkins high availability and disaster recovery.
- JENKINS_HOME directory: Contains all configuration, job definitions, build history, and plugins
- Global configuration files:
config.xml,credentials.xml, etc. - Job configurations: Located in
$JENKINS_HOME/jobs/ - User content: Located in
$JENKINS_HOME/users/ - Plugins: Located in
$JENKINS_HOME/plugins/
Method 1: File System Backup
- Stop Jenkins service:
1
systemctl stop jenkins
- Backup the JENKINS_HOME directory:
1
tar -czf jenkins_backup_$(date +%Y%m%d).tar.gz /var/lib/jenkins
- Start Jenkins service:
1
systemctl start jenkins
- Transfer the backup to a secure location:
1
scp jenkins_backup_*.tar.gz backup-server:/backup/jenkins/
Method 2: Using Jenkins Backup Plugin
- Install the “Backup Plugin”:
- Go to Manage Jenkins → Manage Plugins → Available
- Search for “Backup Plugin”
- Install the plugin and restart Jenkins if needed
- Configure the backup:
- Go to Manage Jenkins → Backup Manager
- Configure backup settings:
- Backup directory
- Backup contents (jobs, plugins, configurations)
- Backup schedule
- Retention policy
- Run a manual backup or wait for the scheduled backup
Method 3: Using ThinBackup Plugin
- Install the “ThinBackup Plugin”:
- Go to Manage Jenkins → Manage Plugins → Available
- Search for “ThinBackup”
- Install the plugin and restart Jenkins if needed
- Configure ThinBackup:
- Go to Manage Jenkins → ThinBackup
- Set the backup directory
- Configure backup settings:
- Backup schedule
- What to backup (configurations, plugins, build results)
- Retention policy
- Run a manual backup or wait for the scheduled backup
Automated Backup Script
Create a script for automated backups:
1
2
3
4
5
6
7
8
9
10
11
12
13
14
15
16
17
18
19
20
21
22
23
24
25
26
27
#!/bin/bash

# Configuration
JENKINS_HOME="/var/lib/jenkins"
BACKUP_DIR="/backup/jenkins"
BACKUP_COUNT=7  # Number of backups to keep

# Create backup filename with date
BACKUP_FILE="$BACKUP_DIR/jenkins_backup_$(date +%Y%m%d).tar.gz"

# Ensure backup directory exists
mkdir -p $BACKUP_DIR

# Stop Jenkins service
systemctl stop jenkins

# Create backup
tar -czf $BACKUP_FILE $JENKINS_HOME

# Start Jenkins service
systemctl start jenkins

# Remove old backups, keeping only the most recent $BACKUP_COUNT
ls -t $BACKUP_DIR/jenkins_backup_*.tar.gz | tail -n +$((BACKUP_COUNT+1)) | xargs -r rm

# Log the backup
echo "Jenkins backup completed: $BACKUP_FILE" >> $BACKUP_DIR/backup.log
Add this script to crontab to run automatically:
1
2
3
4
5
# Edit crontab
crontab -e

# Add this line to run backup every Sunday at 2 AM
0 2 * * 0 /path/to/jenkins_backup.sh
Restoring from Backup
- Stop Jenkins service:
1
systemctl stop jenkins
- Remove or rename the current Jenkins home directory:
1
mv /var/lib/jenkins /var/lib/jenkins.old - Extract the backup:
1
2
mkdir -p /var/lib/jenkins
tar -xzf jenkins_backup_YYYYMMDD.tar.gz -C /
- Fix permissions:
1
chown -R jenkins:jenkins /var/lib/jenkins
- Start Jenkins service:
1
systemctl start jenkins
📚 Shared Libraries in Jenkins
Shared Libraries allow you to define reusable code that can be used across multiple Jenkins pipelines.
What are Shared Libraries?
Shared Libraries are collections of Groovy scripts that can be defined once and used in multiple Jenkins pipelines. They help in:
- Reducing code duplication
- Standardizing pipeline practices
- Centralizing common functionality
- Making pipelines more maintainable
Setting Up a Shared Library
- Create a Git repository with the following structure:
1
2
3
4
5
6
├── src                     # Groovy source files
│   └── org/example/
├── vars                    # Global variables/functions
│   ├── buildApp.groovy
│   └── deployApp.groovy
└── resources               # Non-Groovy files
- Configure the library in Jenkins:
- Go to Manage Jenkins → Configure System
- Scroll to Global Pipeline Libraries
- Click Add
- Enter a name (e.g., “shared-library”)
- Set the default version (e.g., “main”)
- Specify the retrieval method (e.g., “Modern SCM” → Git)
- Enter your repository URL
- Save the configuration
Using Shared Libraries in Pipelines
1
2
3
4
5
6
7
8
9
10
11
12
13
14
15
16
17
18
19
20
21
22
23
// Import the library
@Library('shared-library')_

// Use functions from the library
pipeline {
    agent any

    stages {
        stage('Build') {
            steps {
                // Call a function from the shared library
                buildApp()
            }
        }

        stage('Deploy') {
            steps {
                // Call another function with parameters
                deployApp(env: 'production', region: 'us-west-2')
            }
        }
    }
}
Example Shared Library Function
In your shared library repository, create a file vars/buildApp.groovy:
1
2
3
4
5
6
7
8
9
10
11
12
13
14
15
16
17
// vars/buildApp.groovy
def call(Map config = [:]) {
    // Default configuration
    def settings = [
        tool: 'maven',
        args: '-B clean package'
    ] << config

    // Execute the build based on the tool
    if (settings.tool == 'maven') {
        sh "mvn ${settings.args}"
    } else if (settings.tool == 'gradle') {
        sh "gradle ${settings.args}"
    } else {
        error "Unsupported build tool: ${settings.tool}"
    }
}
🔒 Securing Jenkins
Security is critical for Jenkins as it often has access to sensitive codebases and deployment environments.
Basic Security Measures
- Use HTTPS/SSL:
- Secure your Jenkins instance with SSL certificates
- Prevent man-in-the-middle attacks and credential theft
- Authentication and Authorization:
- Use Jenkins’ built-in user database or integrate with LDAP/AD
- Implement role-based access control (RBAC)
- Consider using the Role-based Authorization Strategy plugin
- Secure Credentials Management:
- Use the Credentials plugin to store sensitive information
- Consider using external secret managers like HashiCorp Vault
- Never hardcode credentials in pipeline scripts
- Keep Jenkins Updated:
- Regularly update Jenkins core and plugins
- Subscribe to the Jenkins security mailing list
Setting Up SSL for Jenkins
- Generate SSL keys:
1
2
3
openssl genrsa -out jenkins.key 2048
openssl req -new -key jenkins.key -out jenkins.csr
openssl x509 -req -days 365 -in jenkins.csr -signkey jenkins.key -out jenkins.crt
- Package the keys into a keystore:
1
openssl pkcs12 -export -out jenkins.p12 -inkey jenkins.key -in jenkins.crt -name jenkins
- Import into a JKS keystore:
1
keytool -importkeystore -srckeystore jenkins.p12 -srcstoretype PKCS12 -destkeystore jenkins.jks
- Copy the JKS file to the Jenkins directory:
1
cp jenkins.jks /var/lib/jenkins/ - Configure Jenkins to use HTTPS:
- Edit
/etc/default/jenkinsor/etc/sysconfig/jenkins - Add/modify these lines:
1
JENKINS_ARGS="--httpPort=-1 --httpsPort=8443 --httpsKeyStore=/var/lib/jenkins/jenkins.jks --httpsKeyStorePassword=your_password"
- Restart Jenkins:
systemctl restart jenkins
- Edit
🐍 Advanced Python Pipeline Example
Here’s a comprehensive Python pipeline that includes environment setup, testing, code quality checks, and reporting:
1
2
3
4
5
6
7
8
9
10
11
12
13
14
15
16
17
18
19
20
21
22
23
24
25
26
27
28
29
30
31
32
33
34
35
36
37
38
39
40
41
42
43
44
45
46
47
48
49
50
51
52
53
54
55
56
57
58
59
60
61
62
63
64
65
66
67
68
69
70
71
72
73
74
75
76
77
78
79
80
81
82
83
84
85
86
87
88
pipeline {
    agent {
        docker {
            image 'python:3.11-slim'
            args '-v ${WORKSPACE}:/app -w /app'
        }
    }

    environment {
        PYTHONPATH = "${WORKSPACE}"
        VIRTUAL_ENV = "${WORKSPACE}/.venv"
        PATH = "${VIRTUAL_ENV}/bin:${PATH}"
    }

    stages {
        stage('Checkout code') {
            steps {
                checkout scm
            }
        }

        stage('Set Up Environment') {
            steps {
                sh '''
                    python -m venv .venv
                    . .venv/bin/activate
                    pip install --upgrade pip
                    pip install -r requirements.txt
                    pip install pytest pytest-cov flake8 pylint
                '''
            }
        }

        stage('Code Review') {
            steps {
                sh '''
                    . .venv/bin/activate
                    flake8 --max-line-length=100 --exclude=.venv,migrations .
                '''
            }
            post {
                always {
                    recordIssues(
                        tools: [flake8(pattern: 'flake8_report.txt')],
                        qualityGates: [[threshold: 10, type: 'TOTAL', unstable: true]]
                    )
                }
            }
        }

        stage('Run Tests') {
            steps {
                sh '''
                    . .venv/bin/activate
                    pytest --junitxml=test-results.xml --cov=. --cov-report=xml --cov-report=html
                '''
            }
            post {
                always {
                    junit 'test-results.xml'
                    recordCoverage(
                        tools: [[parser: 'COBERTURA', pattern: 'coverage.xml']],
                        qualityGates: [[threshold: 80, metric: 'LINE', unstable: true]]
                    )
                }
            }
        }

        stage('Archive Reports') {
            steps {
                archiveArtifacts artifacts: 'htmlcov/**', allowEmptyArchive: true
            }
        }
    }

    post {
        success {
            echo 'Pipeline completed successfully!'
        }
        failure {
            echo 'Pipeline failed!'
        }
        always {
            echo 'Cleaning workspace...'
            cleanWs()
        }
    }
}
🔄 Mini-Project: Integrated Jenkins Pipeline
Here’s a comprehensive pipeline that integrates Jenkins with Maven, SonarQube, and Slack notifications:
1
2
3
4
5
6
7
8
9
10
11
12
13
14
15
16
17
18
19
20
21
22
23
24
25
26
27
28
29
30
31
32
33
34
35
36
37
38
39
40
41
42
43
44
45
46
47
48
49
50
51
52
53
54
55
56
57
58
59
60
61
62
63
64
65
66
67
68
69
70
71
72
73
74
75
76
77
78
79
80
81
pipeline {
  agent any

  parameters {
    choice(name: 'DEPLOY_ENV', choices: ['dev', 'staging', 'prod'], description: 'Select deployment environment')
  }

  environment {
    MVN_CMD = "mvn"
    SONARQUBE_SERVER = 'SonarQubeServer'
    SLACK_CHANNEL = '#ci'
  }

  options {
    timeout(time: 30, unit: 'MINUTES')
  }

  triggers {
    pollSCM('H/5 * * * *')
  }

  stages {
    stage('Checkout') {
      steps {
        git 'https://github.com/your-org/your-repo.git'
      }
    }

    stage('Build & Test') {
      steps {
        sh "${MVN_CMD} clean package"
      }
    }

    stage('SonarQube Analysis') {
      steps {
        withSonarQubeEnv("${SONARQUBE_SERVER}") {
          sh "${MVN_CMD} sonar:sonar"
        }
      }
    }

    stage('Deploy') {
      when {
        expression {
          // Deploy only for dev, staging, or prod parameter
          return params.DEPLOY_ENV in ['dev', 'staging', 'prod']
        }
      }
      steps {
        script {
          if (params.DEPLOY_ENV == 'dev') {
            echo "Deploying to Development environment..."
            // Add your dev deployment commands here, e.g.:
            // sh 'ssh user@dev-server "deploy-dev-script.sh"'
          } else if (params.DEPLOY_ENV == 'staging') {
            echo "Deploying to Staging environment..."
            // Add your staging deployment commands here, e.g.:
            // sh 'ssh user@staging-server "deploy-staging-script.sh"'
          } else if (params.DEPLOY_ENV == 'prod') {
            echo "Deploying to Production environment..."
            // Add your production deployment commands here, e.g.:
            // sh 'ssh user@prod-server "deploy-prod-script.sh"'
          }
        }
      }
    }
  }

  post {
    success {
      slackSend(channel: "${SLACK_CHANNEL}", message: "Build & Deploy Success: ${env.JOB_NAME} #${env.BUILD_NUMBER} to ${params.DEPLOY_ENV}")
    }
    failure {
      slackSend(channel: "${SLACK_CHANNEL}",  message: "Build or Deploy Failed: ${env.JOB_NAME} #${env.BUILD_NUMBER} to ${params.DEPLOY_ENV}")
    }
    always {
      cleanWs()
    }
  }
}