kubernetes kickstart
Setting up a Kubernetes cluster is just the beginning securing it with fine grained access control is what takes your setup from basic to production ready. In this guide, we’ll explore Kubernetes RBAC (Role Based Access Control) from the ground up, including the creation of users, service accounts, roles, and role bindings.
🛠️ New to Kubernetes? If you haven’t set up your
Kubernetes clusteryet or are unsure about your current setup, I highly recommend checking out my previous blog post where I walk you through the complete cluster configuration from installing essential tools to running your first kubectl command. This blog builds directly on that foundation.
🏗️ K8s Architecture and Components
Understanding the architecture of Kubernetes is essential for effectively working with and troubleshooting your clusters. Let’s explore the key components that make up a Kubernetes cluster.
🔍 High-Level Architecture
A Kubernetes cluster consists of two main types of nodes:
- Control Plane (Master) Nodes: Manage the cluster
- Worker Nodes: Run your applications

🎮 Control Plane Components
The Control Plane is responsible for managing the cluster and maintaining its desired state. It consists of several components:
1. API Server (kube-apiserver)
The API server is the front end for the Kubernetes control plane. It exposes the Kubernetes API and handles all administrative operations.
- Validates and processes REST operations
- Serves as the communication hub for all components
- Persists cluster state in etcd
2. etcd
etcd is a consistent and highly-available key-value store used as Kubernetes’ backing store for all cluster data.
- Stores configuration data
- Maintains cluster state
- Implements leader election for high availability
3. Scheduler (kube-scheduler)
The scheduler watches for newly created Pods with no assigned node and selects a node for them to run on.
- Considers resource requirements
- Takes into account quality of service, data locality, and constraints
- Makes scheduling decisions based on affinity/anti-affinity rules
4. Controller Manager (kube-controller-manager)
The controller manager runs controller processes that regulate the state of the cluster.
- Node Controller: Notices and responds when nodes go down
- Replication Controller: Maintains the correct number of pods
- Endpoints Controller: Populates the Endpoints object
- Service Account & Token Controllers: Create default accounts and API access tokens
5. Cloud Controller Manager (cloud-controller-manager)
The cloud controller manager lets you link your cluster into your cloud provider’s API.
- Node Controller: Checks if deleted nodes were deleted in the cloud
- Route Controller: Sets up routes in the cloud
- Service Controller: Creates, updates, and deletes cloud provider load balancers
💻 Worker Node Components
Worker nodes are the machines that run your applications and workloads. Each node includes several components:
1. Kubelet
The kubelet is an agent that runs on each node and ensures that containers are running in a Pod.
- Communicates with the API server
- Manages container lifecycle
- Reports node and Pod status to the control plane
- Runs container liveness and readiness probes
2. Container Runtime
The container runtime is the software responsible for running containers.
- Pulls images from registries
- Starts and stops containers
- Manages container resources
- Examples: containerd, CRI-O, Docker Engine
3. Kube Proxy (kube-proxy)
Kube-proxy maintains network rules on nodes, implementing part of the Kubernetes Service concept.
- Manages network communication inside or outside the cluster
- Implements forwarding rules for Services
- Performs connection forwarding or load balancing
🔌 Add-ons
Add-ons extend the functionality of Kubernetes:
1. DNS
Cluster DNS is a DNS server that serves DNS records for Kubernetes services.
- Provides service discovery within the cluster
- Maps service names to IP addresses
- Enables applications to locate services by name
2. Dashboard
The Dashboard is a web-based UI for Kubernetes clusters.
- Provides visual management of cluster resources
- Monitors applications running in the cluster
- Troubleshoots applications and the cluster itself
3. Container Resource Monitoring
Container Resource Monitoring records generic time-series metrics about containers.
- Collects metrics about containers and nodes
- Stores metrics in a central database
- Provides visualization and alerting capabilities
4. Cluster-level Logging
Cluster-level logging saves container logs to a central log store.
- Collects logs from all containers
- Provides search and analysis capabilities
- Enables long-term log retention
🔄 Kubernetes API Objects
Kubernetes uses API objects to represent the state of your cluster:
- Pods: The smallest deployable units in Kubernetes
- Services: An abstraction to expose applications running on Pods
- Volumes: Storage that persists beyond the lifetime of a container
- Namespaces: Virtual clusters within a physical cluster
- ConfigMaps & Secrets: Configuration and sensitive data
- Deployments, StatefulSets, DaemonSets: Controllers for managing Pods
🌐 Networking in Kubernetes
Kubernetes networking addresses four primary concerns:
-
Container-to-Container Communication: Containers within a Pod share a network namespace and can communicate using localhost.
-
Pod-to-Pod Communication: Every Pod gets its own IP address, and Pods can communicate directly with each other.
-
Pod-to-Service Communication: Services provide stable endpoints for Pods, enabling reliable communication.
-
External-to-Service Communication: External traffic can reach Services through NodePort, LoadBalancer, or Ingress resources.
🔒 Security in Kubernetes
Kubernetes provides several layers of security:
- Authentication: Verifies the identity of users and components
- X.509 certificates
- Service accounts
- OpenID Connect tokens
- Authorization: Determines what actions authenticated users can perform
- Role-Based Access Control (RBAC)
- Attribute-Based Access Control (ABAC)
- Node authorization
- Admission Control: Intercepts requests to the API server to validate or modify them
- Validating admission controllers
- Mutating admission controllers
- Pod Security Policies
- Network Policies: Control traffic flow between Pods and namespaces
🚀 Kubernetes Installation Methods
There are several ways to set up a Kubernetes cluster:
1. Minikube
Minikube is a tool that makes it easy to run Kubernetes locally.
1
2
3
4
5
6
# Install Minikube
curl -LO https://storage.googleapis.com/minikube/releases/latest/minikube-linux-amd64
sudo install minikube-linux-amd64 /usr/local/bin/minikube

# Start a cluster
minikube start
2. kind (Kubernetes IN Docker)
kind lets you run Kubernetes clusters using Docker containers as nodes.
1
2
3
4
5
6
7
# Install kind
curl -Lo ./kind https://kind.sigs.k8s.io/dl/v0.20.0/kind-linux-amd64
chmod +x ./kind
sudo mv ./kind /usr/local/bin/kind

# Create a cluster
kind create cluster
3. kubeadm
kubeadm is a tool for creating production-ready Kubernetes clusters.
1
2
3
4
5
6
7
8
9
10
11
12
13
14
15
16
# Install kubeadm, kubelet, and kubectl
sudo apt-get update
sudo apt-get install -y apt-transport-https ca-certificates curl
sudo curl -fsSLo /usr/share/keyrings/kubernetes-archive-keyring.gpg https://packages.cloud.google.com/apt/doc/apt-key.gpg
echo "deb [signed-by=/usr/share/keyrings/kubernetes-archive-keyring.gpg] https://apt.kubernetes.io/ kubernetes-xenial main" | sudo tee /etc/apt/sources.list.d/kubernetes.list
sudo apt-get update
sudo apt-get install -y kubelet kubeadm kubectl
sudo apt-mark hold kubelet kubeadm kubectl

# Initialize the control plane
sudo kubeadm init

# Set up kubectl
mkdir -p $HOME/.kube
sudo cp -i /etc/kubernetes/admin.conf $HOME/.kube/config
sudo chown $(id -u):$(id -g) $HOME/.kube/config
4. Managed Kubernetes Services
Cloud providers offer managed Kubernetes services:
- Amazon Elastic Kubernetes Service (EKS)
- Google Kubernetes Engine (GKE)
- Azure Kubernetes Service (AKS)
- DigitalOcean Kubernetes
- IBM Cloud Kubernetes Service
🌟 Best Practices
- Use high availability configurations for production environments.
- Separate control plane and worker nodes for better security and resource allocation.
- Implement proper backup strategies for etcd data.
- Use namespaces to organize and isolate resources.
- Implement resource quotas and limits to prevent resource contention.
- Use node labels and taints for proper workload placement.
- Monitor cluster health and performance using appropriate tools.
- Keep Kubernetes and its components updated to benefit from security patches and new features.
- Use a suitable networking plugin based on your requirements.
- Implement proper logging and monitoring for troubleshooting and performance analysis.
By understanding the architecture and components of Kubernetes, you can better design, deploy, and manage your applications in a Kubernetes environment.
🛡️ Role Base Access RBAC-K8S
RBAC stands for Role Based Access Control. It lets you define who (user or service account) can do what (verbs like get, create, delete) on which resources (like pods, deployments, configmaps) and where (namespace or cluster wide).
There are four core RBAC objects:
- Role: Defines permissions within a namespace.
- ClusterRole: Like a Role, but cluster wide.
- RoleBinding: Grants Role permissions to a user or service account in a namespace.
- ClusterRoleBinding: Grants ClusterRole permissions across namespaces.
Let’s break it down with a real world example.
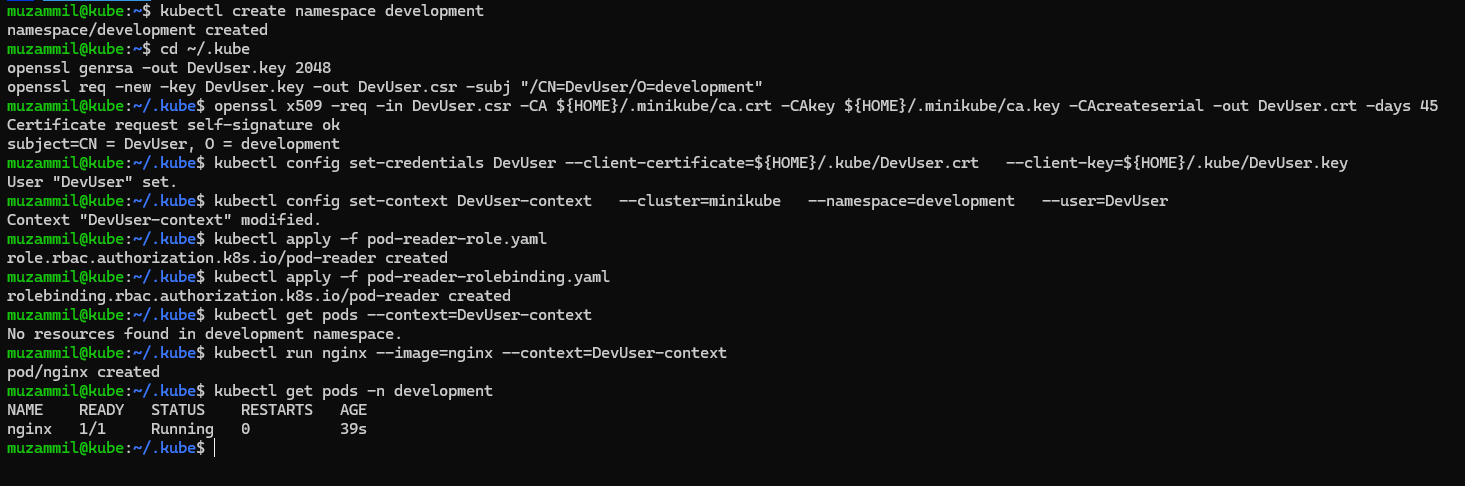
- 🧱 1. Create a Namespace
1
kubectl create namespace development
- 🔐 2. Private Key and CSR for User
1
2
3
cd ~/.kube
openssl genrsa -out DevUser.key 2048
openssl req -new -key DevUser.key -out DevUser.csr -subj "/CN=DevUser/O=development"
The
CN(Common Name) will be the Kubernetes username. TheO(Organization) maps to group membership. - 📜 3. Generate a Signed Certificate
Use the Kubernetes cluster’s CA to sign the request:
1
2
3
4
# minikube
openssl x509 -req -in DevUser.csr -CA ${HOME}/.minikube/ca.crt -CAkey ${HOME}/.minikube/ca.key -CAcreateserial -out DevUser.crt -days 45
# HA_k8S_Cluster
sudo openssl x509 -req -in DevUser.csr -CA /etc/kubernetes/pki/ca.crt -CAkey /etc/kubernetes/pki/ca.key -CAcreateserial -out DevUser.crt -days 45
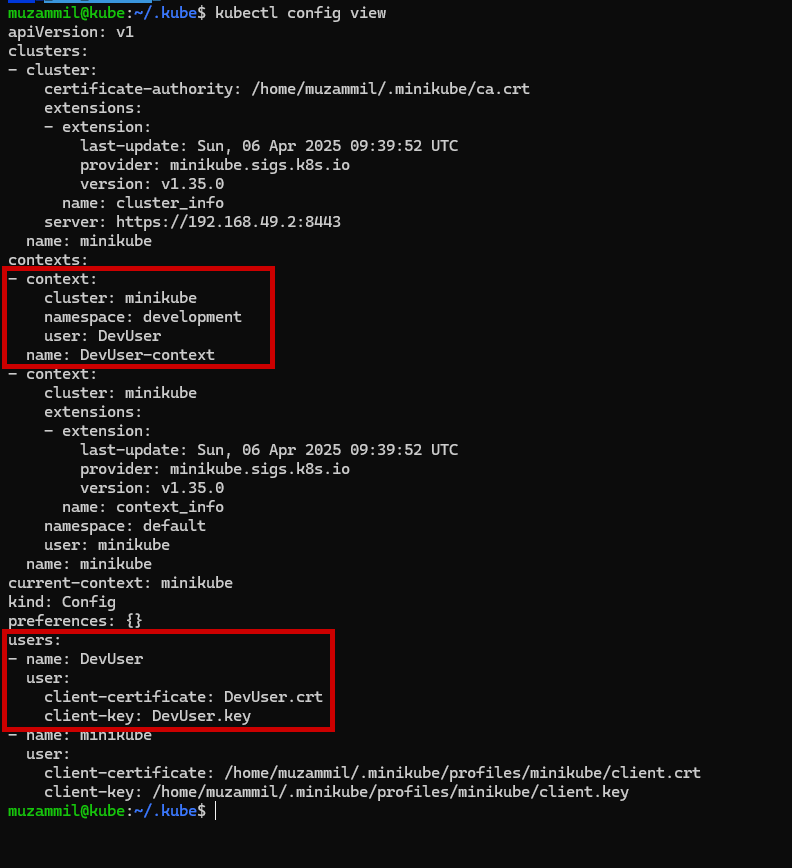
- ⚙️ 4. Add the User to Kubeconfig
1
kubectl config set-credentials DevUser --client-certificate=${HOME}/.kube/DevUser.crt   --client-key=${HOME}/.kube/DevUser.key
- 🌐 5. Set the Context for the User
1
kubectl config set-context DevUser-context   --cluster=\$CLUSTER   --namespace=development   --user=DevUser
🔑 Creating Roles and RoleBindings
Create the pod-reader-role.yaml file and apply the configuration
1
2
3
4
5
6
7
8
9
apiVersion: rbac.authorization.k8s.io/v1
kind: Role
metadata:
  name: pod-reader
  namespace: development
rules:
  - apiGroups: [""]
    resources: ["pods", "pods/log"]
    verbs: ["get", "watch", "list", "update"]
1
kubectl apply -f pod-reader-role.yaml
🔗 RoleBinding YAML
Create the pod-reader-rolebinding.yaml file and apply the configuration
1
2
3
4
5
6
7
8
9
10
11
12
13
apiVersion: rbac.authorization.k8s.io/v1
kind: RoleBinding
metadata:
  name: pod-reader
  namespace: development
subjects:
- kind: User
  name: DevUser
  apiGroup: rbac.authorization.k8s.io
roleRef:
  kind: Role
  name: pod-reader
  apiGroup: rbac.authorization.k8s.io
1
kubectl apply -f pod-reader-rolebinding.yaml
✅ Test Permissions
Switch to the context and try listing pods:
1
kubectl get pods --context=DevUser-context
Create a pod to test it further:
1
kubectl run nginx --image=nginx --context=DevUser-context
🤖 RBAC-K8S with ServiceAccounts
You can also bind roles to ServiceAccounts, which are typically used by applications running inside the cluster.
- 🔧 Create ServiceAccount
1
2
3
4
5
6
  apiVersion: v1
  kind: ServiceAccount
  metadata:
    name: my-serviceaccount
    namespace: development
  automountServiceAccountToken: false
1
kubectl apply -f serviceaccount.yaml -
🔗 RoleBinding for ServiceAccount
1
2
3
4
5
6
7
8
9
10
11
12
13
  apiVersion: rbac.authorization.k8s.io/v1
  kind: RoleBinding
  metadata:
    name: sa-pod-reader
    namespace: development
  subjects:
  - kind: ServiceAccount
    name: my-serviceaccount
    namespace: development
  roleRef:
    kind: Role
    name: pod-reader
    apiGroup: rbac.authorization.k8s.io
1
  kubectl apply -f serviceaccount-rolebinding.yaml
🧼 Clean Up (Optional)
1
2
kubectl delete ns development
rm ${HOME}/.kube/DevUser.*
🌐 k8s Networking and CNI
Networking is a critical aspect of Kubernetes that enables communication between containers, pods, services, and the outside world. Let’s explore the Kubernetes networking model and the Container Network Interface (CNI) plugins that implement it.
🔄 Kubernetes Networking Model
Kubernetes imposes the following fundamental requirements on any networking implementation:
- Pods on a node can communicate with all pods on all nodes without NAT
- Agents on a node (e.g., kubelet, kube-proxy) can communicate with all pods on that node
- Pods in the host network of a node can communicate with all pods on all nodes without NAT
These requirements form the basis of the Kubernetes networking model, which is implemented by various CNI plugins.
🔌 Container Network Interface (CNI)
CNI is a specification and libraries for writing plugins to configure network interfaces in Linux containers. Kubernetes uses CNI plugins to set up pod networking.
Popular CNI Plugins
- Calico
- Layer 3 networking solution that uses BGP to route packets
- Supports network policies for fine-grained access control
- Excellent performance and scalability
- Good choice for production environments
1
2
# Install Calico using kubectl
kubectl apply -f https://docs.projectcalico.org/manifests/calico.yaml
- Flannel
- Simple overlay network that uses vxlan by default
- Easy to set up and maintain
- Good choice for development and testing
- Limited support for network policies
1
2
# Install Flannel using kubectl
kubectl apply -f https://raw.githubusercontent.com/flannel-io/flannel/master/Documentation/kube-flannel.yml
- Weave Net
- Creates a virtual network that connects containers across multiple hosts
- Supports encryption for secure communication
- Includes network policy enforcement
- Good for multi-cloud deployments
1
2
# Install Weave Net using kubectl
kubectl apply -f "https://cloud.weave.works/k8s/net?k8s-version=$(kubectl version | base64 | tr -d '\n')"
- Cilium
- Uses eBPF for high-performance networking and security
- Provides Layer 3-7 network policies
- Excellent observability features
- Good for microservices architectures
1
2
3
# Install Cilium using Helm
helm repo add cilium https://helm.cilium.io/
helm install cilium cilium/cilium --namespace kube-system
🔄 Network Policies
Network Policies are Kubernetes resources that control the traffic flow between pods and namespaces. They act as a firewall for your applications.
Basic Network Policy Example
1
2
3
4
5
6
7
8
9
10
11
12
13
14
15
16
17
18
19
apiVersion: networking.k8s.io/v1
kind: NetworkPolicy
metadata:
  name: allow-frontend-to-backend
  namespace: default
spec:
  podSelector:
    matchLabels:
      app: backend
  policyTypes:
  - Ingress
  ingress:
  - from:
    - podSelector:
        matchLabels:
          app: frontend
    ports:
    - protocol: TCP
      port: 8080
This policy allows pods with the label app: frontend to communicate with pods labeled app: backend on TCP port 8080.
🌟 Service Mesh
A service mesh is a dedicated infrastructure layer for handling service-to-service communication. It provides features like traffic management, security, and observability.
Popular Service Mesh Solutions
- Istio
- Comprehensive service mesh solution
- Provides traffic management, security, and observability
- Supports canary deployments, circuit breaking, and fault injection
- Integrates with various monitoring tools
1
2
3
4
5
# Install Istio using istioctl
curl -L https://istio.io/downloadIstio | sh -
cd istio-*
export PATH=$PWD/bin:$PATH
istioctl install --set profile=demo -y
- Linkerd
- Lightweight service mesh
- Easy to install and use
- Low resource overhead
- Good performance characteristics
1
2
3
4
# Install Linkerd using linkerd CLI
curl -sL https://run.linkerd.io/install | sh
export PATH=$PATH:$HOME/.linkerd2/bin
linkerd install | kubectl apply -f -
- Consul Connect
- Service mesh from HashiCorp
- Integrates with Consul service discovery
- Supports multi-cluster and multi-cloud deployments
- Provides service-to-service encryption
1
2
3
# Install Consul using Helm
helm repo add hashicorp https://helm.releases.hashicorp.com
helm install consul hashicorp/consul --set global.name=consul
🔄 Comparing CNI Plugins
| Feature | Calico | Flannel | Weave Net | Cilium |
|---|---|---|---|---|
| Network Model | Layer 3 (BGP) | Layer 2 (vxlan) | Layer 2/3 | Layer 3/4/7 (eBPF) |
| Network Policies | Yes | No (requires Calico) | Yes | Yes (L3-L7) |
| Encryption | Optional | No | Optional | Optional |
| Performance | High | Medium | Medium | Very High |
| Scalability | Excellent | Good | Good | Excellent |
| Complexity | Medium | Low | Medium | High |
| Use Case | Production | Development | Multi-cloud | Microservices |
🚀 Implementing k8s Networking
Here’s a step-by-step guide to setting up networking in a Kubernetes cluster:
- Choose a CNI Plugin
- Consider your requirements for performance, security, and scalability
- Select a plugin that aligns with your use case
- Install the CNI Plugin
- Follow the installation instructions for your chosen plugin
- Verify that pods can communicate with each other
- Configure Network Policies
- Define policies to control traffic flow
- Start with a default deny policy and add specific allow rules
- Consider a Service Mesh
- Evaluate if you need advanced features like traffic management and observability
- Install and configure a service mesh if needed
🌟 Best Practices
- Use Network Policies to secure communication between pods
- Implement proper segmentation using namespaces and network policies
- Monitor network traffic to detect anomalies and performance issues
- Use a service mesh for complex microservice architectures
- Keep CNI plugins updated to benefit from security patches and new features
- Document your network architecture for easier troubleshooting
- Test network connectivity regularly to ensure proper operation
- Consider network performance when designing your applications
- Use encryption for sensitive traffic
- Implement proper DNS configuration for service discovery
By understanding and properly implementing Kubernetes networking, you can ensure that your applications can communicate securely and efficiently within and outside the cluster.
🔧 K8s: Vars, ConfigMaps & Secrets
When working with real world applications in Kubernetes, environment variables, configuration files, and secrets are essential. They help you manage dynamic configuration, separate sensitive data, and keep your pods flexible.
we’ll explore:
- ✅ Setting environment variables from ConfigMaps and Secrets
- 📦 Using
envFromto bulk import environment variables - 📁 Mounting ConfigMaps and Secrets as volumes
Let’s kickstart with practical YAML examples 🚀
-
🔧 What Are ConfigMaps & Secrets?
- ConfigMap: Stores configuration data as key-value pairs. Ideal for non-sensitive information like file names, port numbers, or settings.
- Secret: Used to store sensitive data like credentials and API tokens. Kubernetes encodes this data in base64.
-
🧪 Creating a ConfigMap
Here’s a sample ConfigMap with both simple key-values and file-style data:
1
2
3
4
5
6
7
8
9
10
11
12
13
apiVersion: v1
kind: ConfigMap
metadata:
  name: game-config
data:
  player_lives: "3"
  properties_file_name: "ui-settings.properties"
  base.properties: |
    enemy.types=ghosts,zombies
    player.maximum-lives=7
  ui-settings.properties: |
    theme=dark
    sounds.enabled=true
Tip: You can apply this ConfigMap using kubectl apply -f $FILE
- 🔐 Create a Secret
Now let’s securely store sensitive data like username and password:
1
2
3
4
5
6
7
8
apiVersion: v1
kind: Secret
metadata:
  name: game-secret
type: Opaque
stringData:
  username: adminYWRtaW4=
  password: c3VwZXJzZWNyZXQxMjM=
Why use Secrets? Unlike ConfigMaps, Secrets are base64-encoded and can be restricted via RBAC
⚙️ Method 1: Inject ConfigMap & Secret as Environment Variables
Here’s how you can load individual keys from a ConfigMap and Secret into environment variables in your Pod env allows you to set environment variables for a container, specifying a value directly for each variable that you name.
1
2
3
4
5
6
7
8
9
10
11
12
13
14
15
16
17
18
19
20
21
22
23
24
25
26
27
28
29
30
apiVersion: v1
kind: Pod
metadata:
  name: pod-env-demo
spec:
  containers:
    - name: app-container
      image: alpine
      command: ["sleep", "3600"]
      env:
        - name: PLAYER_LIVES
          valueFrom:
            configMapKeyRef:
              name: game-config
              key: player_lives
        - name: CONFIG_FILE
          valueFrom:
            configMapKeyRef:
              name: game-config
              key: properties_file_name
        - name: USERNAME
          valueFrom:
            secretKeyRef:
              name: game-secret
              key: username
        - name: PASSWORD
          valueFrom:
            secretKeyRef:
              name: game-secret
              key: password
🛠️ Use case: When you only need specific variables from a ConfigMap/Secret.
🌱 Method 2: Load ConfigMap via envFrom
To inject all values from a ConfigMap as environment variables, use envFrom: allows you to set environment variables for a container by referencing either a ConfigMap or a Secret. When you use envFrom, all the key-value pairs in the referenced ConfigMap or Secret are set as environment variables for the container. You can also specify a common prefix string.
1
2
3
4
5
6
7
8
9
10
11
apiVersion: v1
kind: Pod
metadata:
  name: pod-envfrom-demo
spec:
  containers:
    - name: webapp
      image: nginx
      envFrom:
        - configMapRef:
            name: game-config-lite
Here’s the game-config-lite ConfigMap:
1
2
3
4
5
6
7
apiVersion: v1
kind: ConfigMap
metadata:
  name: game-config-lite
data:
  PLAYER_LIVES: "3"
  CONFIG_MODE: "light"
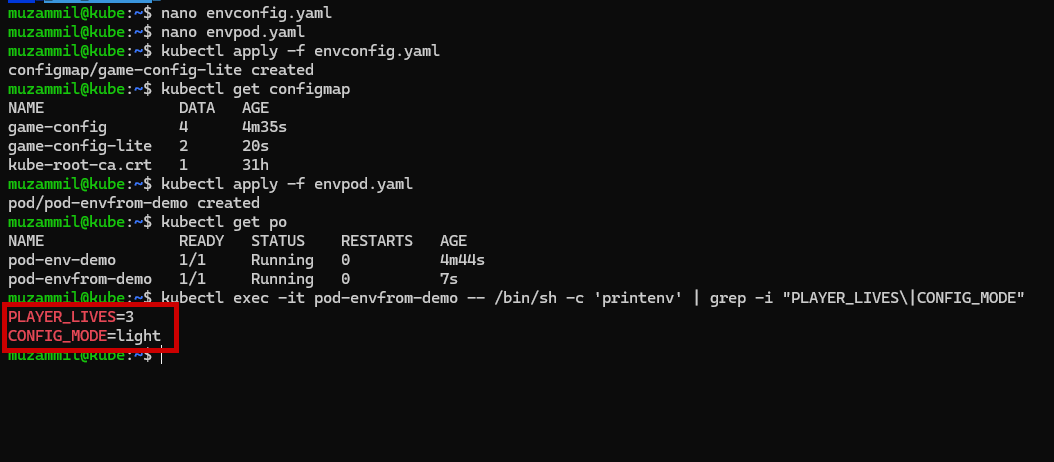
All keys in the ConfigMap become environment variables inside the container.
📁 Method 3: Mount ConfigMap & Secret as Volumes
For scenarios where your app expects config files, mount them as volumes:
1
2
3
4
5
6
7
8
9
10
11
12
13
14
15
16
17
18
19
20
21
apiVersion: v1
kind: Pod
metadata:
  name: pod-volume-demo
spec:
  containers:
    - name: alpine-container
      image: alpine
      command: ["sleep", "3600"]
      volumeMounts:
        - name: config-vol
          mountPath: /app/config
        - name: secret-vol
          mountPath: /app/secret
  volumes:
    - name: config-vol
      configMap:
        name: game-config
    - name: secret-vol
      secret:
        secretName: game-secret
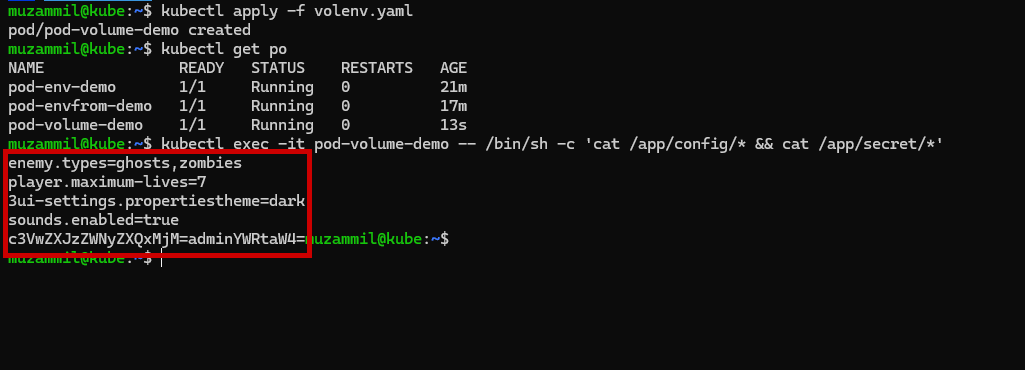
📂 This creates files in the container at /app/config and /app/secret.
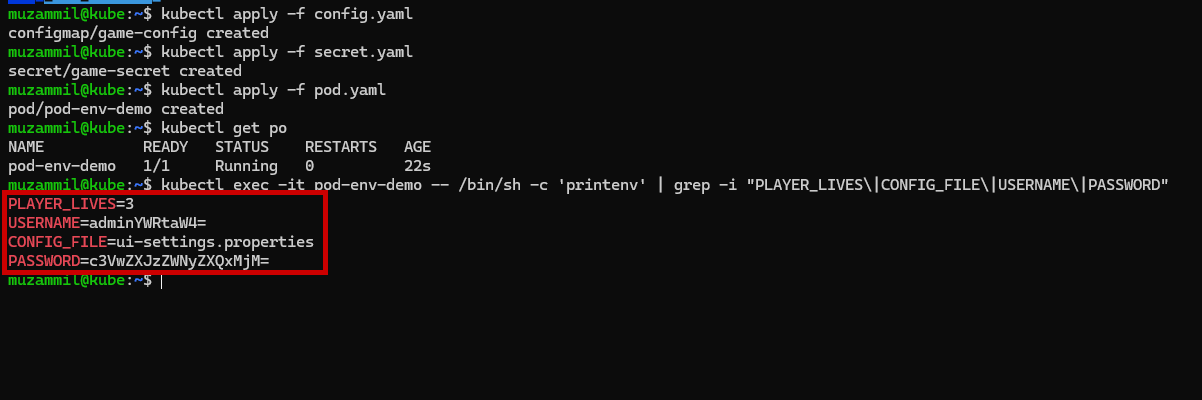
🔍 Verification
After applying the YAMLs:
- Use
kubectl exec -it $pod-name -- /bin/shto enter the container - Run
envorprintenvto see loaded environment variables - Use
cat /app/config/*to read mounted files
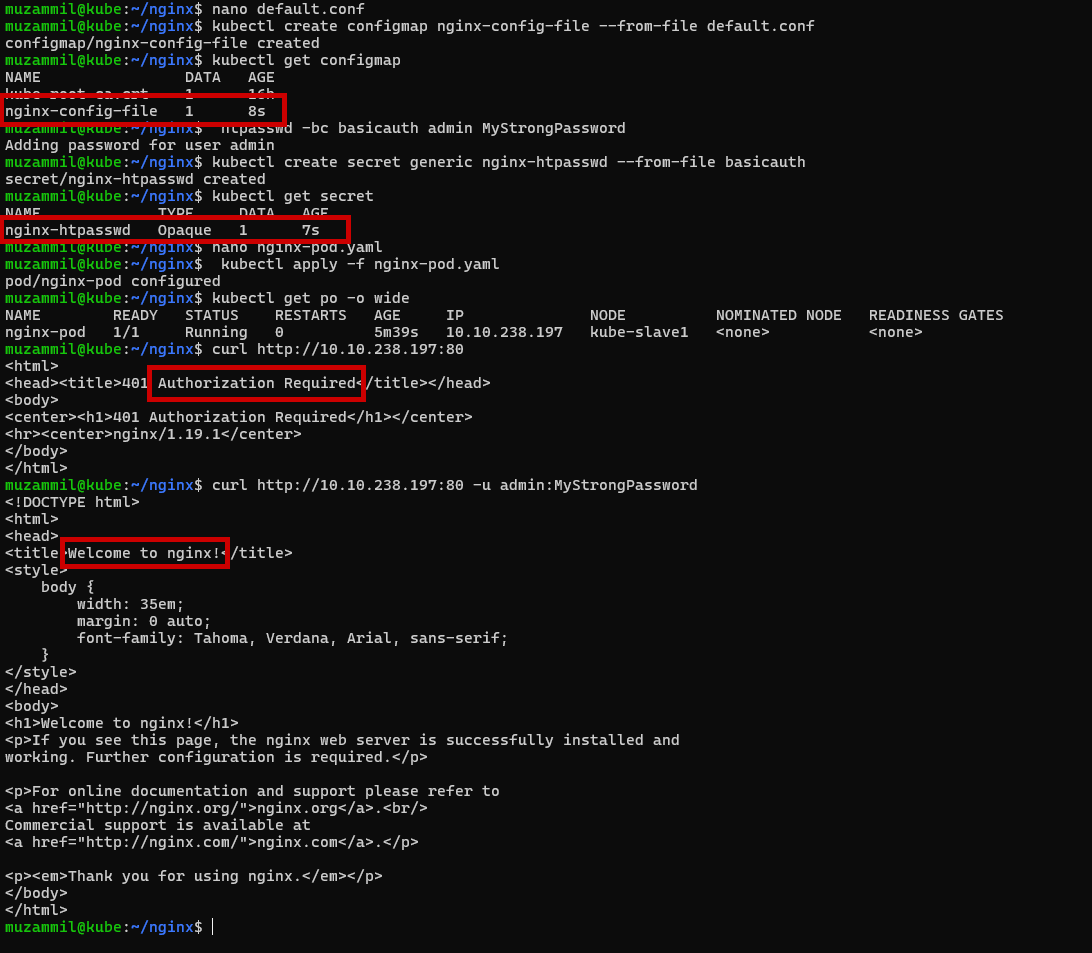
🔐 NGINX Auth with ConfigMap & Secret
To create the above setup in Kubernetes, we need to define:
- A ConfigMap to hold the
nginx.conffile. - A Secret to hold the
.htpasswdcredentials. - A Pod definition to mount both the
ConfigMapandSecretand run the NGINX container.
-
✅ Step: nginx.conf file (save as nginx default.conf)
1
2
3
4
5
6
7
8
9
10
11
12
13
14
15
16
17
18
19
20
21
22
23
24
25
 server {
     listen       80;
     listen  [::]:80;
     server_name  localhost;

     #access_log  /var/log/nginx/host.access.log  main;

     location / {

         auth_basic "Restricted";
         auth_basic_user_file /etc/nginx/config/basicauth;

         root   /usr/share/nginx/html;
         index  index.html index.htm;
     }

     #error_page  404              /404.html;

     # redirect server error pages to the static page /50x.html
     #
     error_page   500 502 503 504  /50x.html;
     location = /50x.html {
         root   /usr/share/nginx/html;
     }
 }
- ✅ Step: Create ConfigMap from
nginx.conf1 2
kubectl create configmap nginx-config-file --from-file default.conf kubectl get configmap && kubectl describe configmap nginx-config-file
-
✅ Step 3: Create Secret for
.htpasswdGenerate
.htpasswdusing Apache utils:1
htpasswd -bc basicauth admin MyStrongPasswordThen create the secret:
1
2
 kubectl create secret generic nginx-htpasswd --from-file basicauth
 kubectl get secret && kubectl describe secret nginx-htpasswd
-
✅ Step: Pod Manifest (nginx-pod.yaml)
1 2 3 4 5 6 7 8 9 10 11 12 13 14 15 16 17 18 19 20 21 22 23 24
apiVersion: v1 kind: Pod metadata: name: nginx-pod spec: containers: - name: nginx-container image: nginx:1.19.1 ports: - containerPort: 80 volumeMounts: - name: nginx-config-volume mountPath: /etc/nginx/conf.d/default.conf subPath: default.conf - name: htpasswd-volume mountPath: /etc/nginx/config volumes: - name: nginx-config-volume configMap: name: nginx-config-file - name: htpasswd-volume secret: secretName: nginx-htpasswd -
✅ Step: Deploy the Pod
1
 kubectl apply -f nginx-pod.yaml
Once it’s up, you can port-forward to access it:
1
 kubectl port-forward pod/nginx-pod 8080:80
Then navigate to http://localhost:8080 and you’ll be prompted for authentication. Use the username and password you added to .htpasswd.
🐳 K8S Container Resources
In Kubernetes, Container Resources play a vital role in efficiently managing workloads across nodes in a cluster. By defining how much CPU and memory a container needs, you can ensure optimal resource utilization, avoid overloading nodes, and maintain application stability.
🎯 Resource Request
A Resource Request is the minimum amount of CPU or memory that a container expects to use. It doesn’t restrict the container’s usage but acts as a scheduling guide for the Kubernetes scheduler.
- Helps the Kube Scheduler decide where to run a pod.
- Prevents pods from being scheduled on nodes that don’t have sufficient resources.
- This doesn’t cap resource usage. A container can consume more than requested if available.
- 🧠 Memory is measured in bytes (e.g., 64Mi for 64 Megabytes).
- 🧮 CPU is measured in millicores (250m = 0.25 vCPU).
1
2
3
4
5
6
7
8
9
10
11
12
13
apiVersion: v1
kind: Pod
metadata:
  name: frontend
spec:
  containers:
  - name: app
    image: nginx
    resources:
      requests:
        memory: "64Mi"
        cpu: "250m"
Explanation:
memory: 64Mi→ Minimum RAM needed.cpu: 250m→ Minimum CPU needed (0.25 vCPU).- Pod will only be scheduled to nodes that can fulfill these minimums.
🚦 Resource Limit
A Resource Limit defines the maximum amount of CPU or memory a container is allowed to consume. These limits are enforced at runtime to prevent any single container from hogging system resources.
- 🔐 Purpose: Protects the node from resource exhaustion due to misbehaving containers.
- 📏 Imposes a hard cap on how much CPU/memory the container can use.
1
2
3
4
5
6
7
8
9
10
11
12
apiVersion: v1
kind: Pod
metadata:
  name: frontend
spec:
  containers:
  - name: app
    image: nginx
    resources:
      limits:
        memory: "128Mi"
        cpu: "500m"
Explanation:
memory: 128Mi→ Max 128Mi RAM allowed.cpu: 500m→ Max 0.5 vCPU allowed.- If usage goes beyond the limit, Kubernetes will throttle or terminate the container.
🏷 Resource Quota (Namespace-wide Limits)
A Resource Quota applies at the namespace level and limits the total amount of CPU, memory, and pods that can be created. This ensures fair usage of cluster resources among different teams or projects.
- Controls the total Requests and Limits for all pods in a namespace.
- Prevents one namespace from consuming all resources.
- Can also limit the number of pods, services, or persistent volume claims.
1
2
3
4
5
6
7
8
9
10
11
12
apiVersion: v1
kind: ResourceQuota
metadata:
  name: dev-quota
  namespace: dev-quota
spec:
  hard:
    requests.cpu: "2"
    requests.memory: "2Gi"
    limits.cpu: "2"
    limits.memory: "4Gi"
    pods: "10"
1
2
3
kubectl apply -f $ResourceQuota_file.yml
kubectl describe quota dev-quota -n dev-quota
kubectl get events -n dev-quota --sort-by='.lastTimestamp'
Explanation:
requests.cpu: "2"→ All pods in this namespace can request up to 2 CPU cores in total.requests.memory: "2Gi"→ Total memory requests can’t exceed 2GiB.limits.cpu: "2"→ Max total CPU limits = 2 cores.limits.memory: "4Gi"→ Max total memory limits = 4GiB.pods: "10"→ No more than 10 pods can exist in the namespace.
📏 LimitRanges in Kubernetes
A LimitRange is a Kubernetes resource that defines minimum, maximum, and default CPU/memory requests and limits for containers or pods in a namespace.
It ensures that workloads have sensible resource boundaries to maintain cluster stability and fairness.
Purpose of LimitRange
- 🚫 Avoid pods without resource limits (which could consume excessive resources).
- ⚖ Provide default CPU/memory requests and limits for a namespace.
- 🔒 Enforce minimum and maximum resource usage for containers.
- 🛡 Prevent accidental resource starvation or abuse.
Key Behavior:
- If a container does not specify requests or limits, Kubernetes automatically applies defaults from the LimitRange.
1
2
3
4
5
6
7
8
9
10
11
12
13
14
15
16
17
18
19
20
apiVersion: v1
kind: LimitRange
metadata:
  name: default-limits
  namespace: dev-quota
spec:
  limits:
  - type: Container
    default:
      cpu: "100m"       # Default CPU limit if none specified
      memory: "256Mi"   # Default memory limit if none specified
    defaultRequest:
      cpu: "50m"        # Default CPU request if none specified
      memory: "128Mi"   # Default memory request if none specified
    min:
      cpu: "10m"        # Minimum CPU request/limit allowed
      memory: "64Mi"    # Minimum memory request/limit allowed
    max:
      cpu: "500m"       # Maximum CPU limit allowed
      memory: "512Mi"   # Maximum memory limit allowed
Explanation:
default→ Automatically set as the limit if the container doesn’t define one.defaultRequest→ Automatically set as the request if the container doesn’t define one.min→ Minimum allowed CPU/memory for requests and limits.max→ Maximum allowed CPU/memory for limits.
1
2
3
kubectl apply -f limitrange.yml
kubectl get limitrange -n dev-team
kubectl describe limitrange default-limits -n dev-team
🩺 Monitoring Containers in K8S
Kubernetes is a feature-rich platform that goes beyond deployment it also offers robust container monitoring tools to ensure high availability, automatic recovery, and smooth operations.
❤️ Container Health
Kubernetes actively monitors containers to determine their state and perform automatic actions, such as restarting a failed container. This keeps your app highly available and fault-tolerant.
- 📡 Monitoring allows Kubernetes to detect crashes, hangs, or readiness delays.
- 🔄 Kubernetes can automatically restart unhealthy containers.
🧪 Liveness Probe
A Liveness Probe checks if your container is alive and functioning properly. Without it, Kubernetes assumes a container is fine as long as the process is running even if it’s stuck.
Liveness probes can be configured in two ways:
- ✅ Exec: Run a command inside the container.
- 🌐 HTTP: Perform periodic health checks via HTTP.
Example: Exec Probe
1
2
3
4
5
6
7
livenessProbe:
  exec:
    command:
    - cat
    - /tmp/healthy
  initialDelaySeconds: 5
  periodSeconds: 5
Example: HTTP Probe
1
2
3
4
5
6
7
8
9
10
livenessProbe:
  httpGet:
    path: /health.html
    port: 8080
    httpHeaders:
    - name: Custom-Header
      value: Awesome
  initialDelaySeconds: 3
  periodSeconds: 3
  timeoutSeconds: 1
🚀 Startup Probe
Some applications take longer to start. That’s where Startup Probes come in. They delay the execution of liveness probes until the application is fully ready to be monitored.
- 🕒 Ensures long-startup apps don’t get killed prematurely.
- ✅ Runs only once at startup; once it succeeds, liveness kicks in.
📄 Example: Startup Probe
1
2
3
4
5
6
startupProbe:
  httpGet:
    path: /health.html
    port: 8080
  failureThreshold: 30
  periodSeconds: 10
⏱️ This config allows up to 5 minutes (30 * 10s) for startup.
⚙️ Readiness Probe
A Readiness Probe checks if the container is ready to handle requests. Until this probe passes, no traffic is routed to the pod.
- Useful when the app depends on external services or needs time to load configs/data.
- Can run in parallel with Liveness Probe.
📄 Example: Readiness Probe
1
2
3
4
5
6
7
readinessProbe:
  exec:
    command:
    - cat
    - /tmp/healthy
  initialDelaySeconds: 5
  periodSeconds: 5
🧪 Liveness Probe using Exec
This pod creates a file /tmp/healthcheck, deletes it after 60 seconds, and the probe checks for its existence.
1
2
3
4
5
6
7
8
9
10
11
12
13
14
15
16
17
18
19
apiVersion: v1
kind: Pod
metadata:
  name: liveness-probe-exec-demo
spec:
  containers:
    - name: busybox-checker
      image: k8s.gcr.io/busybox
      args:
        - /bin/sh
        - -c
        - touch /tmp/healthcheck; sleep 60; rm -rf /tmp/healthcheck; sleep 600
      livenessProbe:
        exec:
          command:
            - stat
            - /tmp/healthcheck
        initialDelaySeconds: 5
        periodSeconds: 5
📝 Explanation:
- touch creates the file.
- After 60 seconds, the file is removed — causing the probe to fail.
- Kubernetes will restart the container after the probe fails.
🌐 Liveness Probe using HTTP
This example sends HTTP GET requests to the root path of an NGINX container.
1
2
3
4
5
6
7
8
9
10
11
12
13
14
apiVersion: v1
kind: Pod
metadata:
  name: liveness-probe-http-demo
spec:
  containers:
    - name: nginx-liveness
      image: k8s.gcr.io/nginx
      livenessProbe:
        httpGet:
          path: /
          port: 80
        initialDelaySeconds: 3
        periodSeconds: 3
📝 Explanation:
- It checks if the web server responds on /.
- If NGINX fails to respond, the container will be restarted.
🚀 Startup Probe using HTTP
Use this probe when your container takes a long time to start.
1
2
3
4
5
6
7
8
9
10
11
12
13
14
apiVersion: v1
kind: Pod
metadata:
  name: startup-probe-http-demo
spec:
  containers:
    - name: nginx-startup
      image: k8s.gcr.io/nginx
      startupProbe:
        httpGet:
          path: /
          port: 80
        failureThreshold: 30
        periodSeconds: 10
📝 Explanation:
- Gives up to 300 seconds (30 * 10) for the container to become healthy.
- If it doesn’t respond within this time, Kubernetes marks it as failed.
⚙️ Readiness Probe using exec
This pod simulates an app that becomes ready after 10 seconds by creating a file /tmp/ready. The readiness probe checks for that file every 5 seconds.
1
2
3
4
5
6
7
8
9
10
11
12
13
14
15
16
17
18
19
apiVersion: v1
kind: Pod
metadata:
  name: readiness-probe
spec:
  containers:
    - name: readiness-container
      image: busybox
      args:
        - /bin/sh
        - -c
        - "sleep 10; touch /tmp/ready; sleep 300"
      readinessProbe:
        exec:
          command:
            - cat
            - /tmp/ready
        initialDelaySeconds: 5
        periodSeconds: 5
📝 Explanation:
- The container sleeps 10 seconds and then creates the
/tmp/readyfile. - The
readinessProbekeeps checking every 5 seconds if the file exists usingcat /tmp/ready. - Only after the file is created, the pod becomes Ready, and starts receiving traffic.
🚑 Restart Policies in K8S
Kubernetes is designed to provide high availability and resilience. One of its powerful features is self-healing ability to automatically restart containers when they fail. This behavior is controlled through container restart policies.
Let’s dive into the different Restart Policies available in Kubernetes and how they contribute to creating self-healing workloads.
🔁 Container Restart Policies
Kubernetes provides built-in restart policies that define how the kubelet should handle container restarts within a Pod. These policies allow you to define when and how a container should be restarted in case of failure or success.
Kubernetes supports three restart policies:
- Always
- OnFailure
- Never
🔹 Note: Restart policies apply only to Pods created directly (not managed by controllers like Deployments). Deployments always use restartPolicy:
Always.
✅ Always Restart Policy
- This is the default restart policy in Kubernetes.
- Containers are restarted regardless of the exit status—even if the container exits successfully.
- Ideal for long-running services that should always remain running (e.g., web servers, APIs).
1
2
3
4
5
6
7
8
9
10
apiVersion: v1
kind: Pod
metadata:
  name: pod-restart-always
spec:
  restartPolicy: Always
  containers:
    - name: always-container
      image: alpine
      command: ["sleep", "10"]
⚠️ OnFailure Restart Policy
- The container is restarted only if it exits with a non-zero status code (i.e., on failure).
- It also triggers restart if the liveness probe fails.
- Best for batch jobs or scripts that should run again only on failure.
apiVersion: v1
kind: Pod
metadata:
  name: pod-restart-onfailure
spec:
  restartPolicy: OnFailure
  containers:
    - name: onfailure-container
      image: alpine
      command: ["sh", "-c", "exit 1"]
⛔ Never Restart Policy
- The container will never be restarted, regardless of success or failure.
- Suitable for one-time jobs or scripts that should not be retried automatically.
1
2
3
4
5
6
7
8
9
10
apiVersion: v1
kind: Pod
metadata:
  name: pod-restart-never
spec:
  restartPolicy: Never
  containers:
    - name: never-container
      image: alpine
      command: ["sh", "-c", "exit 1"]
🧩 Multi-Container & Init in K8S
In Kubernetes, a Pod is the smallest deployable unit that can contain one or more containers. While most Pods typically run a single container, there are use cases where multiple containers working closely together sharing resources like storage, networking and before these containers run, you might need to set up the environment or check dependencies — that’s where Init Containers shine.
Multi-Container Pods Kubernetes allows Pods to run multiple containers that:
- Share the same network namespace (localhost)
- Can share storage volumes
- Are scheduled and managed as a single unit
Init Containers are special containers in a Pod that:
- Run before the application containers start.
- Execute only once during Pod startup.
- Are executed sequentially, one after the other.
- Must complete successfully before any app container starts.
They are ideal for tasks like waiting for a service, performing setup logic, or preparing configuration/data before launching the main container.
🔁 Init Container Flow
1
[ Init Container 1 ] ---> [ Init Container 2 ] ---> [ App Container(s) ]
- All Init Containers must run to completion before the main container(s) start.
- You can define multiple Init Containers, and they will execute in order.
1
2
3
4
5
6
7
8
9
10
11
12
13
14
15
16
17
18
19
20
21
22
23
24
25
26
27
28
29
30
31
32
33
34
35
36
37
38
39
40
41
42
43
44
45
46
47
48
49
50
51
52
53
54
55
56
57
58
59
60
61
62
63
64
65
66
67
68
69
apiVersion: v1
kind: Service
metadata:
  name: mysql
spec:
  ports:
    - protocol: TCP
      port: 3306
      targetPort: 3306
---
apiVersion: v1
kind: Service
metadata:
  name: redis
spec:
  ports:
    - protocol: TCP
      port: 6379
      targetPort: 6379
---
apiVersion: v1
kind: Pod
metadata:
  name: webapp-pod
spec:
  volumes:
    - name: shared-logs
      emptyDir: {}

  initContainers:
    - name: init-db
      image: busybox:1.28
      command:
        - sh
        - -c
        - |
          until nslookup mysql.$(cat /var/run/secrets/kubernetes.io/serviceaccount/namespace).svc.cluster.local;
          do echo "⏳ Waiting for MySQL..."; sleep 5; done
    - name: init-redis
      image: busybox:1.28
      command:
        - sh
        - -c
        - |
          until nslookup redis.$(cat /var/run/secrets/kubernetes.io/serviceaccount/namespace).svc.cluster.local;
          do echo "⏳ Waiting for Redis..."; sleep 5; done

  containers:
    - name: web-app
      image: busybox:1.28
      volumeMounts:
        - name: shared-logs
          mountPath: /var/log/app
      command:
        - sh
        - -c
        - |
          echo "🚀 Starting Web App" > /var/log/app/app.log;
          sleep 3600

    - name: log-collector
      image: busybox:1.28
      volumeMounts:
        - name: shared-logs
          mountPath: /var/log/app
      command:
        - sh
        - -c
        - tail -f /var/log/app/app.log
This setup uses init containers (init-db and init-redis) to ensure that MySQL and Redis services are reachable before starting the main application. These init containers simulate readiness checks, blocking the app from starting until all dependencies are up. Once they complete, the main containers start.
The web-app container writes logs to a shared path (/var/log/app/app.log), and the log-collector container continuously reads (tails) these logs using a shared volume mounted between them.
This demonstrates how containers within the same Pod can communicate and share data. To test this setup, you can deploy fake or real MySQL and Redis services, apply the manifest using kubectl apply -f file.yaml, and then run kubectl logs webapp-pod -c log-collector to see the log output.
💾 k8s: PVs, PVCs, and StorageClasses
Managing storage in Kubernetes is a distinct challenge from managing compute resources. Kubernetes provides a robust storage system through Persistent Volumes (PVs), Persistent Volume Claims (PVCs), and Storage Classes to abstract the details of how storage is provided from how it is consumed.
🗄️ Understanding Kubernetes Storage
In Kubernetes, storage management revolves around three key concepts:
- Persistent Volume (PV): A piece of storage in the cluster provisioned by an administrator or dynamically provisioned using Storage Classes.
- Persistent Volume Claim (PVC): A request for storage by a user that can be fulfilled by a PV.
- Storage Class: Describes the “classes” of storage offered and allows for dynamic provisioning of PVs.
📦 Persistent Volumes (PVs)
A PersistentVolume is a cluster resource that represents a piece of storage. PVs have a lifecycle independent of any individual Pod that uses the PV.
1
2
3
4
5
6
7
8
9
10
11
12
13
14
apiVersion: v1
kind: PersistentVolume
metadata:
  name: pv-example
  labels:
    type: local
spec:
  storageClassName: manual
  capacity:
    storage: 10Gi
  accessModes:
    - ReadWriteOnce
  hostPath:
    path: "/mnt/data"
📝 Note: In production, you would typically use network storage like NFS, iSCSI, or cloud provider storage instead of
hostPath, which is suitable only for testing on a single-node cluster.
📋 Persistent Volume Claims (PVCs)
A PersistentVolumeClaim is a request for storage by a user. It’s similar to how Pods consume node resources - PVCs consume PV resources.
1
2
3
4
5
6
7
8
9
10
11
apiVersion: v1
kind: PersistentVolumeClaim
metadata:
  name: pvc-example
spec:
  storageClassName: manual
  accessModes:
    - ReadWriteOnce
  resources:
    requests:
      storage: 3Gi
🔄 Lifecycle of PVs and PVCs
The interaction between PVs and PVCs follows this lifecycle:
- Provisioning: PVs are either statically created by an administrator or dynamically provisioned using Storage Classes.
- Binding: A PVC is bound to a suitable PV that meets its requirements.
- Using: Pods use the PVC as a volume, and the cluster mounts the corresponding PV.
- Reclaiming: When a PVC is deleted, the PV can be reclaimed according to its reclaim policy (Delete, Retain, or Recycle).
🏷️ Storage Classes
StorageClasses enable dynamic provisioning of PVs. They define the provisioner to use and parameters for the storage.
1
2
3
4
5
6
7
8
9
10
11
12
apiVersion: storage.k8s.io/v1
kind: StorageClass
metadata:
  name: fast-storage
  annotations:
    storageclass.kubernetes.io/is-default-class: "false"
provisioner: kubernetes.io/aws-ebs
reclaimPolicy: Delete
allowVolumeExpansion: true
parameters:
  type: gp2
  fsType: ext4
🔌 Using PVCs in Pods
Once you have a PVC, you can use it in a Pod as a volume:
1
2
3
4
5
6
7
8
9
10
11
12
13
14
15
16
17
18
apiVersion: v1
kind: Pod
metadata:
  name: database-pod
spec:
  containers:
    - name: database
      image: mysql:5.7
      env:
        - name: MYSQL_ROOT_PASSWORD
          value: "password"
      volumeMounts:
        - mountPath: "/var/lib/mysql"
          name: mysql-data
  volumes:
    - name: mysql-data
      persistentVolumeClaim:
        claimName: pvc-example
🚀 EG: WordPress with MySQL
Here’s a complete example of deploying WordPress with MySQL using PVs and PVCs:
1
2
3
4
5
6
7
8
9
10
11
12
13
14
15
16
17
18
19
20
21
22
23
24
25
26
27
28
29
30
31
32
33
34
35
36
37
38
39
40
41
42
43
44
45
46
47
48
49
50
51
52
53
54
55
56
57
58
59
60
61
62
63
64
65
66
67
68
69
70
71
72
73
74
75
76
77
78
79
80
81
82
83
84
85
86
87
88
89
90
91
92
93
94
95
96
97
98
99
100
101
102
103
104
105
106
107
108
109
110
111
112
113
114
115
116
117
118
119
120
121
122
123
124
# MySQL Storage
apiVersion: v1
kind: PersistentVolumeClaim
metadata:
  name: mysql-pvc
spec:
  accessModes:
    - ReadWriteOnce
  resources:
    requests:
      storage: 5Gi
---
# WordPress Storage
apiVersion: v1
kind: PersistentVolumeClaim
metadata:
  name: wordpress-pvc
spec:
  accessModes:
    - ReadWriteOnce
  resources:
    requests:
      storage: 5Gi
---
# MySQL Deployment
apiVersion: apps/v1
kind: Deployment
metadata:
  name: mysql
spec:
  selector:
    matchLabels:
      app: mysql
  strategy:
    type: Recreate
  template:
    metadata:
      labels:
        app: mysql
    spec:
      containers:
      - image: mysql:5.7
        name: mysql
        env:
        - name: MYSQL_ROOT_PASSWORD
          value: password
        - name: MYSQL_DATABASE
          value: wordpress
        - name: MYSQL_USER
          value: wordpress
        - name: MYSQL_PASSWORD
          value: wordpress
        ports:
        - containerPort: 3306
          name: mysql
        volumeMounts:
        - name: mysql-persistent-storage
          mountPath: /var/lib/mysql
      volumes:
      - name: mysql-persistent-storage
        persistentVolumeClaim:
          claimName: mysql-pvc
---
# MySQL Service
apiVersion: v1
kind: Service
metadata:
  name: mysql
spec:
  ports:
  - port: 3306
  selector:
    app: mysql
---
# WordPress Deployment
apiVersion: apps/v1
kind: Deployment
metadata:
  name: wordpress
spec:
  selector:
    matchLabels:
      app: wordpress
  strategy:
    type: Recreate
  template:
    metadata:
      labels:
        app: wordpress
    spec:
      containers:
      - image: wordpress:latest
        name: wordpress
        env:
        - name: WORDPRESS_DB_HOST
          value: mysql
        - name: WORDPRESS_DB_USER
          value: wordpress
        - name: WORDPRESS_DB_PASSWORD
          value: wordpress
        - name: WORDPRESS_DB_NAME
          value: wordpress
        ports:
        - containerPort: 80
          name: wordpress
        volumeMounts:
        - name: wordpress-persistent-storage
          mountPath: /var/www/html
      volumes:
      - name: wordpress-persistent-storage
        persistentVolumeClaim:
          claimName: wordpress-pvc
---
# WordPress Service
apiVersion: v1
kind: Service
metadata:
  name: wordpress
spec:
  ports:
  - port: 80
  selector:
    app: wordpress
  type: LoadBalancer
🔍 Access Modes for PVs and PVCs
Kubernetes supports several access modes for PVs and PVCs:
- ReadWriteOnce (RWO): The volume can be mounted as read-write by a single node.
- ReadOnlyMany (ROX): The volume can be mounted as read-only by many nodes.
- ReadWriteMany (RWX): The volume can be mounted as read-write by many nodes.
- ReadWriteOncePod (RWOP): The volume can be mounted as read-write by a single pod.
⚠️ Important: Not all volume types support all access modes. Check the Kubernetes documentation for compatibility.
🧹 Reclaim Policies
When a PVC is deleted, the PV can be handled according to its reclaim policy:
- Delete: The PV and its associated storage are automatically deleted.
- Retain: The PV remains but is considered “released” (not available for reuse without manual intervention).
- Recycle: Basic scrub (rm -rf /thevolume/*) is performed, and the volume is made available again.
📊 Dynamic Provisioning with Storage Classes
To enable dynamic provisioning, create a StorageClass and make a PVC that references it:
1
2
3
4
5
6
7
8
9
10
11
12
13
14
15
16
17
18
19
apiVersion: storage.k8s.io/v1
kind: StorageClass
metadata:
  name: fast
provisioner: kubernetes.io/gce-pd
parameters:
  type: pd-ssd
---
apiVersion: v1
kind: PersistentVolumeClaim
metadata:
  name: dynamic-pvc
spec:
  storageClassName: fast
  accessModes:
    - ReadWriteOnce
  resources:
    requests:
      storage: 10Gi
When this PVC is created, Kubernetes will automatically provision a PV that meets its requirements using the specified StorageClass.
🔧 Volume Expansion
Some StorageClasses support volume expansion, allowing you to increase the size of a PVC:
1
2
3
4
5
6
7
8
apiVersion: storage.k8s.io/v1
kind: StorageClass
metadata:
  name: expandable-storage
provisioner: kubernetes.io/aws-ebs
allowVolumeExpansion: true
parameters:
  type: gp2
To expand a PVC, simply edit its resource requests:
1
2
3
4
5
6
7
8
9
10
11
apiVersion: v1
kind: PersistentVolumeClaim
metadata:
  name: expandable-pvc
spec:
  storageClassName: expandable-storage
  accessModes:
    - ReadWriteOnce
  resources:
    requests:
      storage: 20Gi  # Increased from original size
📝 Note: You can only expand volumes, not shrink them.
🌟 Best Practices
- Use StorageClasses for dynamic provisioning to automate storage management.
- Set appropriate reclaim policies based on your data importance.
- Consider access modes carefully when designing your application.
- Use appropriate volume types for your workload (e.g., block storage for databases, file storage for shared files).
- Implement backup solutions for your persistent data.
- Monitor storage usage to avoid running out of space.
- Use labels and annotations to organize and identify your storage resources.
- Test storage failover scenarios to ensure data durability.
By understanding and properly implementing Kubernetes storage concepts, you can ensure that your applications have reliable, scalable, and manageable storage solutions.
🌐 k8s Services, Ingress, and LB’s
Exposing your applications to the outside world or to other services within the cluster is a fundamental aspect of Kubernetes. Let’s explore the different ways to expose your applications.
🔀 k8s Traffic Flow: user to Pod

🔄 Kubernetes Services
A Service in Kubernetes is an abstraction that defines a logical set of Pods and a policy to access them. Services enable loose coupling between dependent Pods.
Types of Services
Kubernetes offers several types of Services to meet different exposure needs:
1. ClusterIP (default)
- Exposes the Service on an internal IP within the cluster
- Only reachable within the cluster
1
2
3
4
5
6
7
8
9
10
11
apiVersion: v1
kind: Service
metadata:
  name: my-internal-service
spec:
  selector:
    app: MyApp
  ports:
  - protocol: TCP
    port: 80
    targetPort: 9376
2. NodePort
- Exposes the Service on each Node’s IP at a static port
- Accessible from outside the cluster using
<NodeIP>:<NodePort>
1
2
3
4
5
6
7
8
9
10
11
12
apiVersion: v1
kind: Service
metadata:
  name: my-nodeport-service
spec:
  type: NodePort
  selector:
    app: MyApp
  ports:
  - port: 80
    targetPort: 9376
    nodePort: 30007  # Optional: if not specified, a port is allocated from the range 30000-32767
3. LoadBalancer
- Exposes the Service externally using a cloud provider’s load balancer
- Automatically creates the necessary NodePort and ClusterIP services
1
2
3
4
5
6
7
8
9
10
11
12
apiVersion: v1
kind: Service
metadata:
  name: my-loadbalancer-service
spec:
  type: LoadBalancer
  selector:
    app: MyApp
  ports:
  - protocol: TCP
    port: 80
    targetPort: 9376
4. ExternalName
- Maps the Service to the contents of the
externalNamefield (e.g.,foo.bar.example.com) - Returns a CNAME record with the external service’s DNS name
1
2
3
4
5
6
7
apiVersion: v1
kind: Service
metadata:
  name: my-externalname-service
spec:
  type: ExternalName
  externalName: my.database.example.com
🔄 Ingress Controllers
An Ingress Controller is responsible for fulfilling the Ingress rules. Here’s how to deploy the Nginx Ingress Controller:
Nginx Ingress Controller
1
2
3
4
5
6
7
# Using Helm (recommended)
helm repo add ingress-nginx https://kubernetes.github.io/ingress-nginx
helm repo update
helm install nginx-ingress ingress-nginx/ingress-nginx

# Or using kubectl
kubectl apply -f https://raw.githubusercontent.com/kubernetes/ingress-nginx/controller-v1.8.2/deploy/static/provider/cloud/deploy.yaml
Traefik Ingress Controller
1
2
3
4
5
6
7
# Using Helm (recommended)
helm repo add traefik https://helm.traefik.io/traefik
helm repo update
helm install traefik traefik/traefik

# Or using kubectl
kubectl apply -f https://raw.githubusercontent.com/traefik/traefik/v2.13/docs/content/reference/dynamic-configuration/kubernetes-crd.yaml
HAProxy Ingress Controller
1
2
3
4
5
6
7
# Using Helm (recommended)
helm repo add haproxytech https://haproxytech.github.io/helm-charts
helm repo update
helm install haproxy-ingress haproxytech/kubernetes-ingress

# Or using kubectl
kubectl apply -f https://raw.githubusercontent.com/haproxytech/kubernetes-ingress/v1.14/deploy/haproxy-ingress.yaml
Each Ingress Controller watches for Ingress resources and routes external traffic to backend services accordingly. Choose the one that fits your needs based on features, performance, and ease of use.
MetalLB Installation (Bare-metal LB’s)
MetalLB provides software LoadBalancer functionality for bare-metal/local Kubernetes clusters.
Install MetalLB manifests
1
2
3
4
5
6
helm repo add metallb https://metallb.github.io/metallb
helm repo update
helm install metallb metallb/metallb --namespace metallb-system --create-namespac
kubectl label namespace metallb-system pod-security.kubernetes.io/enforce=privileged --overwrite
kubectl rollout restart daemonset metallb-speaker -n metallb-system
kubectl get pods -n metallb-system
Create IPAddressPool & L2Advertisement config
Create a file metallb-config.yaml with your IP range:
1
2
3
4
5
6
7
8
9
10
11
12
13
14
15
16
17
apiVersion: metallb.io/v1beta1
kind: IPAddressPool
metadata:
  namespace: metallb-system
  name: my-ip-pool
spec:
  addresses:
  - 192.168.1.240-192.168.1.250   # Adjust to your free IP range
---
apiVersion: metallb.io/v1beta1
kind: L2Advertisement
metadata:
  namespace: metallb-system
  name: l2-advertisement
spec:
  ipAddressPools:
  - my-ip-pool
1
2
3
4
5
# kubectl describe svc traefik | grep -i "type:"
# kubectl patch svc traefik -p '{"spec": {"type": "LoadBalancer"}}'

kubectl apply -f metallb-config.yaml
kubectl get svc traefik
🚪 Ingress Resources
Ingress is an API object that manages external access to services in a cluster, typically HTTP/HTTPS. Ingress can provide load balancing, SSL termination, and name-based virtual hosting.
📝 Note: Ingress requires an Ingress Controller to work. Popular controllers include Nginx, Traefik, and HAProxy.
Basic Ingress Example
1
2
3
4
5
6
7
8
9
10
11
12
13
14
15
16
17
18
19
apiVersion: networking.k8s.io/v1
kind: Ingress
metadata:
  name: minimal-ingress
  annotations:
    nginx.ingress.kubernetes.io/rewrite-target: /
spec:
  ingressClassName: nginx
  rules:
  - host: myapp.example.com
    http:
      paths:
      - path: /
        pathType: Prefix
        backend:
          service:
            name: my-service
            port:
              number: 80
Ingress with Multiple Hosts and Paths
1
2
3
4
5
6
7
8
9
10
11
12
13
14
15
16
17
18
19
20
21
22
23
24
25
26
27
apiVersion: networking.k8s.io/v1
kind: Ingress
metadata:
  name: multi-host-ingress
spec:
  ingressClassName: nginx
  rules:
  - host: foo.example.com
    http:
      paths:
      - path: /foo
        pathType: Prefix
        backend:
          service:
            name: foo-service
            port:
              number: 80
  - host: bar.example.com
    http:
      paths:
      - path: /bar
        pathType: Prefix
        backend:
          service:
            name: bar-service
            port:
              number: 80
Traefik Ingress Middleware Rewrite
Traefik does not use the nginx rewrite annotation (nginx.ingress.kubernetes.io/rewrite-target). Instead, you define a Middleware resource to handle path rewriting and reference it in the Ingress.
Middleware for Rewrite
1
2
3
4
5
6
7
8
apiVersion: traefik.containo.us/v1alpha1
kind: Middleware
metadata:
  name: rewrite-root
spec:
  rewrite:
    regex: "^/foo(/|$)(.*)"
    replacement: "/$2"
- This middleware rewrites paths starting with
/footo/.
Use Middleware in Ingress
1
2
3
4
5
6
7
8
9
10
11
12
13
14
15
16
17
18
19
20
apiVersion: networking.k8s.io/v1
kind: Ingress
metadata:
  name: traefik-ingress
  annotations:
    traefik.ingress.kubernetes.io/router.entrypoints: web
    traefik.ingress.kubernetes.io/router.middlewares: default-rewrite-root@kubernetescrd
spec:
  ingressClassName: traefik
  rules:
  - host: myapp.example.com
    http:
      paths:
      - path: /foo
        pathType: Prefix
        backend:
          service:
            name: my-service
            port:
              number: 80
- The annotation
traefik.ingress.kubernetes.io/router.middlewaresreferences the middleware you created (rewrite-rootin thedefaultnamespace). - Adjust
@kubernetescrdto your middleware namespace if different.
For a more comprehensive list of middleware services with detailed insights to help you implement them effectively, please refer Traefik Ingress Middleware Rules
Ingress with TLS
1
2
3
4
5
6
7
8
9
10
11
12
13
14
15
16
17
18
19
20
21
apiVersion: networking.k8s.io/v1
kind: Ingress
metadata:
  name: tls-ingress
spec:
  ingressClassName: nginx
  tls:
  - hosts:
    - secure.example.com
    secretName: tls-secret  # Secret containing the TLS certificate and key
  rules:
  - host: secure.example.com
    http:
      paths:
      - path: /
        pathType: Prefix
        backend:
          service:
            name: secure-service
            port:
              number: 80
To create the TLS secret:
1
kubectl create secret tls tls-secret --cert=path/to/cert.crt --key=path/to/key.key
🌟 Service Mesh
For more advanced service-to-service communication, you might want to consider a service mesh like Istio or Linkerd. A service mesh provides features like:
- Advanced traffic management
- Service discovery
- Load balancing
- Failure recovery
- Metrics collection
- Security
🚀 EG: Multi-Tier Application
Here’s a complete example of a multi-tier application with proper service and ingress configuration:
1
2
3
4
5
6
7
8
9
10
11
12
13
14
15
16
17
18
19
20
21
22
23
24
25
26
27
28
29
30
31
32
33
34
35
36
37
38
39
40
41
42
43
44
45
46
47
48
49
50
51
52
53
54
55
56
57
58
59
60
61
62
63
64
65
66
67
68
69
70
71
72
73
74
75
76
77
78
79
80
81
82
83
84
85
86
87
88
89
90
91
92
93
# Backend Service (ClusterIP)
apiVersion: v1
kind: Service
metadata:
  name: backend-service
spec:
  selector:
    app: backend
  ports:
  - port: 8080
    targetPort: 8080
---
# Backend Deployment
apiVersion: apps/v1
kind: Deployment
metadata:
  name: backend
spec:
  replicas: 3
  selector:
    matchLabels:
      app: backend
  template:
    metadata:
      labels:
        app: backend
    spec:
      containers:
      - name: backend
        image: my-backend-image:latest
        ports:
        - containerPort: 8080
---
# Frontend Service (ClusterIP)
apiVersion: v1
kind: Service
metadata:
  name: frontend-service
spec:
  selector:
    app: frontend
  ports:
  - port: 80
    targetPort: 80
---
# Frontend Deployment
apiVersion: apps/v1
kind: Deployment
metadata:
  name: frontend
spec:
  replicas: 3
  selector:
    matchLabels:
      app: frontend
  template:
    metadata:
      labels:
        app: frontend
    spec:
      containers:
      - name: frontend
        image: my-frontend-image:latest
        ports:
        - containerPort: 80
---
# Ingress Resource
apiVersion: networking.k8s.io/v1
kind: Ingress
metadata:
  name: app-ingress
  annotations:
    nginx.ingress.kubernetes.io/rewrite-target: /$1
spec:
  ingressClassName: nginx
  rules:
  - host: myapp.example.com
    http:
      paths:
      - path: /api(/|$)(.*)
        pathType: Prefix
        backend:
          service:
            name: backend-service
            port:
              number: 8080
      - path: /(/|$)(.*)
        pathType: Prefix
        backend:
          service:
            name: frontend-service
            port:
              number: 80
🔍 Service Discovery
Kubernetes provides built-in service discovery through DNS. Each Service gets a DNS entry in the format:
1
<service-name>.<namespace>.svc.cluster.local
For example, a service named backend-service in the default namespace would be accessible at backend-service.default.svc.cluster.local.
🌟 Best Practices
- Use meaningful names for your Services and Ingress resources.
- Implement health checks to ensure traffic is only routed to healthy Pods.
- Use labels and selectors effectively to target the right Pods.
- Configure appropriate timeouts and retries to handle transient failures.
- Implement TLS for secure communication.
- Use annotations to customize Ingress Controller behavior.
- Monitor your Services and Ingress for performance and availability.
- Consider using a service mesh for complex microservice architectures.
- Use network policies to control traffic flow between services.
- Implement rate limiting to protect your services from overload.
By properly configuring Services and Ingress, you can ensure that your applications are accessible, secure, and reliable.
🚀 K8s: Deploy, Stateful & DaemonSets
Kubernetes provides several resource types to deploy and manage your applications. Let’s explore the three main workload resources: Deployments, StatefulSets, and DaemonSets.
📦 Deployments
Deployments are the most common way to deploy applications in Kubernetes. They provide declarative updates for Pods and ReplicaSets, making it easy to manage application rollouts and rollbacks.
Key Features of Deployments
- Scaling: Easily scale the number of replicas up or down
- Rolling Updates: Update Pods gradually without downtime
- Rollbacks: Revert to previous versions if issues occur
- Pause/Resume: Pause and resume updates for debugging
Basic Deployment Example
1
2
3
4
5
6
7
8
9
10
11
12
13
14
15
16
17
18
19
20
21
apiVersion: apps/v1
kind: Deployment
metadata:
  name: nginx-deployment
  labels:
    app: nginx
spec:
  replicas: 3
  selector:
    matchLabels:
      app: nginx
  template:
    metadata:
      labels:
        app: nginx
    spec:
      containers:
      - name: nginx
        image: nginx:1.14.2
        ports:
        - containerPort: 80
Deployment Update Strategies
Deployments support two update strategies:
1. RollingUpdate (default): Gradually replaces old Pods with new ones
1
2
3
4
5
6
spec:
  strategy:
    type: RollingUpdate
    rollingUpdate:
      maxSurge: 25%
      maxUnavailable: 25%
2. Recreate: Terminates all existing Pods before creating new ones
1
2
3
spec:
  strategy:
    type: Recreate
MatchExpressions in Selectors
Adding MatchExpressions to Deployment or ReplicaSet Selector
You can use matchExpressions under the selector to define complex label queries with operators such as In, NotIn, Exists, and DoesNotExist. This allows fine-grained control over pod selection.
Example snippet to add under spec.selector or spec.template.metadata.labels:
1
2
3
4
5
6
7
8
9
10
11
12
13
14
15
selector:
  matchExpressions:
    - key: environment
      operator: In
      values:
        - production
        - staging
    - key: tier
      operator: NotIn
      values:
        - frontend
    - key: debug
      operator: Exists
    - key: deprecated
      operator: DoesNotExist
Explanation of operators:
- In: The key’s value must be in the specified list.
- NotIn: The key’s value must NOT be in the specified list.
- Exists: The key must exist, regardless of value.
- DoesNotExist: The key must NOT exist.
You can combine multiple expressions to build complex selectors for your Deployment or ReplicaSet.
Common Deployment Commands
1
2
3
4
5
6
7
8
9
10
11
12
13
14
15
16
17
18
19
20
# Create a deployment
kubectl create deployment nginx --image=nginx

# Scale a deployment
kubectl scale deployment nginx --replicas=5

# Update a deployment's image
kubectl set image deployment/nginx nginx=nginx:1.16.1

# Check rollout status
kubectl rollout status deployment/nginx

# View rollout history
kubectl rollout history deployment/nginx

# Rollback to previous version
kubectl rollout undo deployment/nginx

# Rollback to specific revision
kubectl rollout undo deployment/nginx --to-revision=2
📊 StatefulSets
StatefulSets are designed for applications that require stable, unique network identifiers, stable persistent storage, and ordered deployment and scaling.
Key Features of StatefulSets
- Stable Network Identity: Each Pod gets a persistent hostname with a predictable DNS name
- Ordered Deployment: Pods are created and terminated in order
- Stable Storage: Each Pod can be associated with its own persistent storage
- Ordered Scaling: Scaling operations happen in order
When to Use StatefulSets
- Databases (MySQL, PostgreSQL, MongoDB)
- Distributed systems (Kafka, ZooKeeper, Elasticsearch)
- Applications that need stable network identities
- Applications that need ordered scaling
Basic StatefulSet Example
1
2
3
4
5
6
7
8
9
10
11
12
13
14
15
16
17
18
19
20
21
22
23
24
25
26
27
28
29
30
31
32
apiVersion: apps/v1
kind: StatefulSet
metadata:
  name: web
spec:
  serviceName: "nginx"
  replicas: 3
  selector:
    matchLabels:
      app: nginx
  template:
    metadata:
      labels:
        app: nginx
    spec:
      containers:
      - name: nginx
        image: nginx:1.14.2
        ports:
        - containerPort: 80
          name: web
        volumeMounts:
        - name: www
          mountPath: /usr/share/nginx/html
  volumeClaimTemplates:
  - metadata:
      name: www
    spec:
      accessModes: [ "ReadWriteOnce" ]
      resources:
        requests:
          storage: 1Gi
Headless Service for StatefulSets
StatefulSets typically require a Headless Service to control the domain of the Pods:
1
2
3
4
5
6
7
8
9
10
11
12
13
apiVersion: v1
kind: Service
metadata:
  name: nginx
  labels:
    app: nginx
spec:
  ports:
  - port: 80
    name: web
  clusterIP: None
  selector:
    app: nginx
🔄 DaemonSets
DaemonSets ensure that all (or some) nodes run a copy of a Pod. As nodes are added to the cluster, Pods are added to them. As nodes are removed, those Pods are garbage collected.
Key Features of DaemonSets
- Node-Level Operations: Run a Pod on every node (or selected nodes)
- Automatic Pod Creation: Automatically creates Pods on new nodes
- Automatic Pod Cleanup: Automatically removes Pods from deleted nodes
When to Use DaemonSets
- Cluster storage daemons (e.g., ceph)
- Log collection daemons (e.g., fluentd, logstash)
- Node monitoring daemons (e.g., Prometheus Node Exporter)
- Network plugins that require a component on every node
Basic DaemonSet Example
1
2
3
4
5
6
7
8
9
10
11
12
13
14
15
16
17
18
19
20
21
22
23
24
25
26
27
28
29
30
31
32
33
34
35
36
37
38
39
40
41
apiVersion: apps/v1
kind: DaemonSet
metadata:
  name: fluentd-elasticsearch
  namespace: kube-system
  labels:
    k8s-app: fluentd-logging
spec:
  selector:
    matchLabels:
      name: fluentd-elasticsearch
  template:
    metadata:
      labels:
        name: fluentd-elasticsearch
    spec:
      tolerations:
      - key: node-role.kubernetes.io/master
        effect: NoSchedule
      containers:
      - name: fluentd-elasticsearch
        image: quay.io/fluentd_elasticsearch/fluentd:v2.5.2
        resources:
          limits:
            memory: 200Mi
          requests:
            cpu: 100m
            memory: 200Mi
        volumeMounts:
        - name: varlog
          mountPath: /var/log
        - name: varlibdockercontainers
          mountPath: /var/lib/docker/containers
          readOnly: true
      volumes:
      - name: varlog
        hostPath:
          path: /var/log
      - name: varlibdockercontainers
        hostPath:
          path: /var/lib/docker/containers
DaemonSet with Node Selector
You can use a node selector to run a DaemonSet only on specific nodes:
1
2
3
4
5
spec:
  template:
    spec:
      nodeSelector:
        disk: ssd
🔄 Jobs and CronJobs
Jobs and CronJobs are for running tasks that should complete and terminate, rather than running continuously.
Jobs
A Job creates one or more Pods and ensures that a specified number of them successfully terminate.
1
2
3
4
5
6
7
8
9
10
11
12
13
14
15
apiVersion: batch/v1
kind: Job
metadata:
  name: pi
spec:
  completions: 5    # Number of successful pod completions required
  parallelism: 2    # Number of pods to run in parallel
  backoffLimit: 4   # Number of retries before marking as failed
  template:
    spec:
      containers:
      - name: pi
        image: perl
        command: ["perl", "-Mbignum=bpi", "-wle", "print bpi(2000)"]
      restartPolicy: Never
CronJobs
A CronJob creates Jobs on a schedule, similar to cron in Unix-like systems.
1
2
3
4
5
6
7
8
9
10
11
12
13
14
15
apiVersion: batch/v1
kind: CronJob
metadata:
  name: hello
spec:
  schedule: "*/1 * * * *"  # Every minute
  jobTemplate:
    spec:
      template:
        spec:
          containers:
          - name: hello
            image: busybox
            command: ["/bin/sh", "-c", "date; echo Hello from Kubernetes"]
          restartPolicy: OnFailure
🔄 Comparing Workload Types
| Feature | Deployment | StatefulSet | DaemonSet |
|---|---|---|---|
| Use Case | Stateless applications | Stateful applications | Node-level operations |
| Scaling | Can scale to any number of replicas | Ordered scaling | One Pod per node |
| Pod Identity | Pods are interchangeable | Pods have stable identities | Pods are tied to nodes |
| Storage | Shared storage | Individual storage per Pod | Typically uses node storage |
| Network | Service load balancing | Stable network identity | Node-level networking |
| Updates | Rolling updates | Ordered updates | Node-by-node updates |
| Examples | Web servers, API servers | Databases, message brokers | Monitoring agents, log collectors |
🌟 Best Practices
- Choose the right workload type for your application’s requirements.
- Set resource requests and limits to ensure proper scheduling and resource allocation.
- Implement proper health checks (liveness and readiness probes) for reliable operations.
- Use labels and annotations to organize and identify your resources.
- Configure update strategies appropriate for your application’s availability requirements.
- Set appropriate termination grace periods to allow for graceful shutdowns.
- Use Pod Disruption Budgets to ensure availability during voluntary disruptions.
- Implement proper logging and monitoring to track the health and performance of your workloads.
- Use ConfigMaps and Secrets to manage configuration and sensitive data.
- Consider using Horizontal Pod Autoscalers to automatically scale your workloads based on metrics.
By understanding the different workload types in Kubernetes, you can choose the right resource for your application’s needs and ensure reliable, scalable, and manageable deployments.
📊 K8s Observability and Monitoring
Observability and monitoring are critical aspects of running Kubernetes in production. They help you understand the health, performance, and behavior of your applications and infrastructure.
🔍 The Three Pillars of Observability
- Metrics: Numerical data points collected over time
- Logs: Timestamped records of discrete events
- Traces: Records of requests as they flow through distributed systems
📈 Metrics Collection
Kubernetes provides several ways to collect metrics:
1. Kubernetes Metrics Server
The Metrics Server collects resource metrics from Kubelets and exposes them through the Kubernetes API server for use by the HPA (Horizontal Pod Autoscaler) and VPA (Vertical Pod Autoscaler).
1
2
3
4
5
# Install Metrics Server
kubectl apply -f https://github.com/kubernetes-sigs/metrics-server/releases/latest/download/components.yaml

# Verify installation
kubectl get deployment metrics-server -n kube-system
2. Prometheus
Prometheus is a popular open-source monitoring system that works well with Kubernetes.
1
2
3
4
5
6
7
8
9
10
11
12
13
14
15
16
17
18
19
20
21
22
23
24
25
26
27
28
29
30
31
32
33
34
35
36
37
38
39
40
41
42
43
44
45
46
47
48
49
50
51
52
53
54
55
56
57
58
59
60
61
62
63
64
65
66
67
68
69
70
71
72
73
74
75
76
77
78
79
80
81
82
83
84
85
86
87
88
89
90
91
92
93
94
95
96
97
# prometheus-configmap.yaml
apiVersion: v1
kind: ConfigMap
metadata:
  name: prometheus-config
data:
  prometheus.yml: |
    global:
      scrape_interval: 15s
    scrape_configs:
      - job_name: 'kubernetes-apiservers'
        kubernetes_sd_configs:
        - role: endpoints
        scheme: https
        tls_config:
          ca_file: /var/run/secrets/kubernetes.io/serviceaccount/ca.crt
        bearer_token_file: /var/run/secrets/kubernetes.io/serviceaccount/token
        relabel_configs:
        - source_labels: [__meta_kubernetes_namespace, __meta_kubernetes_service_name, __meta_kubernetes_endpoint_port_name]
          action: keep
          regex: default;kubernetes;https
      - job_name: 'kubernetes-nodes'
        kubernetes_sd_configs:
        - role: node
        scheme: https
        tls_config:
          ca_file: /var/run/secrets/kubernetes.io/serviceaccount/ca.crt
        bearer_token_file: /var/run/secrets/kubernetes.io/serviceaccount/token
        relabel_configs:
        - action: labelmap
          regex: __meta_kubernetes_node_label_(.+)
      - job_name: 'kubernetes-pods'
        kubernetes_sd_configs:
        - role: pod
        relabel_configs:
        - source_labels: [__meta_kubernetes_pod_annotation_prometheus_io_scrape]
          action: keep
          regex: true
        - source_labels: [__meta_kubernetes_pod_annotation_prometheus_io_path]
          action: replace
          target_label: __metrics_path__
          regex: (.+)
        - source_labels: [__address__, __meta_kubernetes_pod_annotation_prometheus_io_port]
          action: replace
          regex: ([^:]+)(?::\d+)?;(\d+)
          replacement: $1:$2
          target_label: __address__
        - action: labelmap
          regex: __meta_kubernetes_pod_label_(.+)
        - source_labels: [__meta_kubernetes_namespace]
          action: replace
          target_label: kubernetes_namespace
        - source_labels: [__meta_kubernetes_pod_name]
          action: replace
          target_label: kubernetes_pod_name
---
# prometheus-deployment.yaml
apiVersion: apps/v1
kind: Deployment
metadata:
  name: prometheus
spec:
  replicas: 1
  selector:
    matchLabels:
      app: prometheus
  template:
    metadata:
      labels:
        app: prometheus
    spec:
      serviceAccountName: prometheus
      containers:
      - name: prometheus
        image: prom/prometheus:v2.45.0
        ports:
        - containerPort: 9090
        volumeMounts:
        - name: config-volume
          mountPath: /etc/prometheus
      volumes:
      - name: config-volume
        configMap:
          name: prometheus-config
---
# prometheus-service.yaml
apiVersion: v1
kind: Service
metadata:
  name: prometheus
spec:
  selector:
    app: prometheus
  ports:
  - port: 9090
    targetPort: 9090
  type: ClusterIP
3. Custom Metrics API
The Custom Metrics API allows you to expose application-specific metrics to the Kubernetes API server.
1
2
3
4
# Install Prometheus Adapter for Custom Metrics API
helm repo add prometheus-community https://prometheus-community.github.io/helm-charts
helm repo update
helm install prometheus-adapter prometheus-community/prometheus-adapter
📝 Log Collection
Kubernetes generates logs at the pod level, but you’ll need additional tools to aggregate and analyze them.
1. Fluentd/Fluent Bit
Fluentd and Fluent Bit are open-source data collectors that can collect, parse, and forward logs to various backends.
1
2
3
4
5
6
7
8
9
10
11
12
13
14
15
16
17
18
19
20
21
22
23
24
25
26
27
28
29
30
31
32
33
34
35
36
37
38
39
40
41
42
43
44
45
46
47
48
49
50
51
# fluent-bit-configmap.yaml
apiVersion: v1
kind: ConfigMap
metadata:
  name: fluent-bit-config
  namespace: logging
data:
  fluent-bit.conf: |
    [SERVICE]
        Flush         1
        Log_Level     info
        Daemon        off
        Parsers_File  parsers.conf

    [INPUT]
        Name              tail
        Tag               kube.*
        Path              /var/log/containers/*.log
        Parser            docker
        DB                /var/log/flb_kube.db
        Mem_Buf_Limit     5MB
        Skip_Long_Lines   On
        Refresh_Interval  10

    [FILTER]
        Name                kubernetes
        Match               kube.*
        Kube_URL            https://kubernetes.default.svc:443
        Kube_CA_File        /var/run/secrets/kubernetes.io/serviceaccount/ca.crt
        Kube_Token_File     /var/run/secrets/kubernetes.io/serviceaccount/token
        Merge_Log           On
        K8S-Logging.Parser  On
        K8S-Logging.Exclude Off

    [OUTPUT]
        Name            es
        Match           *
        Host            elasticsearch
        Port            9200
        Logstash_Format On
        Logstash_Prefix kubernetes_cluster
        Replace_Dots    On
        Retry_Limit     False

  parsers.conf: |
    [PARSER]
        Name        docker
        Format      json
        Time_Key    time
        Time_Format %Y-%m-%dT%H:%M:%S.%L
        Time_Keep   On
2. Elasticsearch, Fluentd, and Kibana (EFK) Stack
The EFK stack is a popular combination for log collection, storage, and visualization.
1
2
3
4
5
6
7
8
9
10
11
12
13
14
15
# Install EFK stack using Helm
helm repo add elastic https://helm.elastic.co
helm repo update

# Create namespace
kubectl create namespace logging

# Install Elasticsearch
helm install elasticsearch elastic/elasticsearch --namespace logging

# Install Kibana
helm install kibana elastic/kibana --namespace logging

# Install Fluentd
helm install fluentd stable/fluentd --namespace logging
🔄 Distributed Tracing
Distributed tracing helps you understand the flow of requests through your microservices architecture.
Jaeger
Jaeger is an open-source distributed tracing system.
1
2
3
4
5
6
7
8
9
10
11
12
13
14
15
16
17
18
19
20
21
22
23
24
25
26
27
28
29
30
31
32
33
34
35
36
37
38
39
40
41
42
# jaeger-all-in-one.yaml
apiVersion: apps/v1
kind: Deployment
metadata:
  name: jaeger
  labels:
    app: jaeger
spec:
  replicas: 1
  selector:
    matchLabels:
      app: jaeger
  template:
    metadata:
      labels:
        app: jaeger
    spec:
      containers:
      - name: jaeger
        image: jaegertracing/all-in-one:1.46
        ports:
        - containerPort: 16686
          name: web
        - containerPort: 14268
          name: collector
---
apiVersion: v1
kind: Service
metadata:
  name: jaeger
  labels:
    app: jaeger
spec:
  ports:
  - port: 16686
    name: web
    targetPort: web
  - port: 14268
    name: collector
    targetPort: collector
  selector:
    app: jaeger
📊 Visualization and Dashboards
Grafana
Grafana is a popular open-source visualization tool that works well with Prometheus.
1
2
3
4
5
6
7
8
9
10
11
12
13
14
15
16
17
18
19
20
21
22
23
24
25
26
27
28
29
30
31
32
33
34
35
36
37
38
# grafana-deployment.yaml
apiVersion: apps/v1
kind: Deployment
metadata:
  name: grafana
spec:
  replicas: 1
  selector:
    matchLabels:
      app: grafana
  template:
    metadata:
      labels:
        app: grafana
    spec:
      containers:
      - name: grafana
        image: grafana/grafana:10.0.3
        ports:
        - containerPort: 3000
        env:
        - name: GF_SECURITY_ADMIN_PASSWORD
          value: "admin"
        - name: GF_USERS_ALLOW_SIGN_UP
          value: "false"
---
# grafana-service.yaml
apiVersion: v1
kind: Service
metadata:
  name: grafana
spec:
  selector:
    app: grafana
  ports:
  - port: 3000
    targetPort: 3000
  type: ClusterIP
🚨 Alerting
Alertmanager
Alertmanager handles alerts sent by Prometheus and routes them to the appropriate receiver.
1
2
3
4
5
6
7
8
9
10
11
12
13
14
15
16
17
18
19
20
21
22
23
24
25
26
27
28
29
30
31
32
33
34
35
36
37
38
39
40
41
42
43
44
45
46
47
48
49
50
51
52
53
54
55
56
57
58
59
60
61
62
63
64
65
66
# alertmanager-configmap.yaml
apiVersion: v1
kind: ConfigMap
metadata:
  name: alertmanager-config
data:
  alertmanager.yml: |
    global:
      resolve_timeout: 5m

    route:
      group_by: ['alertname', 'job']
      group_wait: 30s
      group_interval: 5m
      repeat_interval: 12h
      receiver: 'email'

    receivers:
    - name: 'email'
      email_configs:
      - to: 'alerts@example.com'
        from: 'alertmanager@example.com'
        smarthost: 'smtp.example.com:587'
        auth_username: 'alertmanager@example.com'
        auth_password: 'password'
---
# alertmanager-deployment.yaml
apiVersion: apps/v1
kind: Deployment
metadata:
  name: alertmanager
spec:
  replicas: 1
  selector:
    matchLabels:
      app: alertmanager
  template:
    metadata:
      labels:
        app: alertmanager
    spec:
      containers:
      - name: alertmanager
        image: prom/alertmanager:v0.25.0
        ports:
        - containerPort: 9093
        volumeMounts:
        - name: config-volume
          mountPath: /etc/alertmanager
      volumes:
      - name: config-volume
        configMap:
          name: alertmanager-config
---
# alertmanager-service.yaml
apiVersion: v1
kind: Service
metadata:
  name: alertmanager
spec:
  selector:
    app: alertmanager
  ports:
  - port: 9093
    targetPort: 9093
  type: ClusterIP
🔄 Monitoring Stack Example
Here’s how to set up a complete monitoring stack using Prometheus Operator with Helm:
1
2
3
4
5
6
7
8
9
10
11
12
# Add Prometheus community Helm repository
helm repo add prometheus-community https://prometheus-community.github.io/helm-charts
helm repo update

# Create monitoring namespace
kubectl create namespace monitoring

# Install kube-prometheus-stack (includes Prometheus, Alertmanager, Grafana, and exporters)
helm install prometheus prometheus-community/kube-prometheus-stack --namespace monitoring

# Verify installation
kubectl get pods -n monitoring
🌟 Best Practices
1️⃣ Monitor both infrastructure and applications
- Collect metrics from nodes, pods, and containers
- Instrument your applications to expose custom metrics
2️⃣ Implement proper log management
- Centralize logs for easier analysis
- Use structured logging formats (JSON)
- Implement log rotation to manage storage
3️⃣ Set up meaningful alerts
- Focus on actionable alerts
- Avoid alert fatigue by reducing noise
- Implement proper notification channels
4️⃣ Use dashboards effectively
- Create dashboards for different stakeholders
- Include both high-level and detailed views
- Use templates for consistency
5️⃣ Implement distributed tracing
- Trace requests across microservices
- Identify performance bottlenecks
- Understand service dependencies
6️⃣ Establish baselines and SLOs
- Define Service Level Objectives (SLOs)
- Monitor against established baselines
- Track trends over time
7️⃣ Automate remediation when possible
- Use Horizontal Pod Autoscaler for scaling
- Implement self-healing mechanisms
- Create runbooks for common issues
8️⃣ Regularly review and optimize
- Periodically review monitoring coverage
- Optimize resource usage of monitoring tools
- Update alert thresholds based on experience
By implementing a comprehensive observability and monitoring strategy, you can ensure the reliability, performance, and security of your Kubernetes applications and infrastructure.
🔒 k8s Security Best Practices
Security is a critical aspect of running Kubernetes in production. Here are comprehensive best practices to secure your Kubernetes clusters and applications.
🛡️ Cluster Security
1. Control Plane Security
- Secure API Server: Limit access to the Kubernetes API server using firewall rules and API server flags.
- Encrypt etcd Data: Enable encryption at rest for etcd to protect sensitive data.
1
2
3
4
5
6
7
8
9
10
11
12
# Example etcd encryption configuration
apiVersion: apiserver.config.k8s.io/v1
kind: EncryptionConfiguration
resources:
  - resources:
    - secrets
    providers:
    - aescbc:
        keys:
        - name: key1
          secret: <base64-encoded-key>
    - identity: {}
- Use TLS for all components: Ensure all control plane components communicate using TLS.
- Rotate certificates regularly: Set up automated certificate rotation.
2. Node Security
- Minimize host OS footprint: Use minimal OS distributions like Container-Optimized OS or CoreOS.
- Keep nodes updated: Regularly apply security patches to node operating systems.
- Secure kubelet: Configure kubelet with appropriate authentication and authorization.
1
2
3
4
5
# Example kubelet configuration with secure settings
kubelet --anonymous-auth=false \
        --authorization-mode=Webhook \
        --client-ca-file=/etc/kubernetes/pki/ca.crt \
        --read-only-port=0
- Use node authorizer: Limit node access to necessary API objects.
🔐 Authentication and Authorization
1. Authentication Methods
- Use strong authentication: Implement X.509 certificates, OpenID Connect, or service accounts.
- Avoid static tokens: Prefer short-lived credentials over static tokens.
- Integrate with identity providers: Connect Kubernetes authentication with your organization’s identity provider.
2. Role-Based Access Control (RBAC)
- Follow principle of least privilege: Grant only necessary permissions.
- Use namespaces for isolation: Separate teams and applications using namespaces.
- Create fine-grained roles: Define specific roles for different responsibilities.
1
2
3
4
5
6
7
8
9
10
11
12
13
14
15
16
17
18
19
20
21
22
23
24
25
26
27
# Example of a restricted role for developers
apiVersion: rbac.authorization.k8s.io/v1
kind: Role
metadata:
  namespace: development
  name: developer
rules:
- apiGroups: [""] # "" indicates the core API group
  resources: ["pods", "services"]
  verbs: ["get", "list", "watch", "create", "update", "patch", "delete"]
- apiGroups: ["apps"]
  resources: ["deployments"]
  verbs: ["get", "list", "watch", "create", "update", "patch", "delete"]
---
apiVersion: rbac.authorization.k8s.io/v1
kind: RoleBinding
metadata:
  name: developer-binding
  namespace: development
subjects:
- kind: Group
  name: developers
  apiGroup: rbac.authorization.k8s.io
roleRef:
  kind: Role
  name: developer
  apiGroup: rbac.authorization.k8s.io
- Regularly audit RBAC policies: Review and update access controls as needed.
🔒 Pod Security
1. Pod Security Standards
Kubernetes defines three Pod Security Standards:
- Privileged: Unrestricted policy, providing the widest possible level of permissions.
- Baseline: Minimally restrictive policy that prevents known privilege escalations.
- Restricted: Heavily restricted policy, following current Pod hardening best practices.
1
2
3
4
5
6
7
8
9
# Example namespace with Pod Security Standards
apiVersion: v1
kind: Namespace
metadata:
  name: restricted-namespace
  labels:
    pod-security.kubernetes.io/enforce: restricted
    pod-security.kubernetes.io/audit: restricted
    pod-security.kubernetes.io/warn: restricted
2. Security Context
- Run containers as non-root: Avoid running containers as the root user.
- Use read-only root filesystem: Make container filesystems read-only when possible.
- Drop capabilities: Remove unnecessary Linux capabilities.
1
2
3
4
5
6
7
8
9
10
11
12
13
14
15
16
17
18
19
20
21
22
# Example Pod with security context
apiVersion: v1
kind: Pod
metadata:
  name: secure-pod
spec:
  securityContext:
    runAsNonRoot: true
    runAsUser: 1000
    runAsGroup: 3000
    fsGroup: 2000
  containers:
  - name: secure-container
    image: nginx:1.25.1
    securityContext:
      allowPrivilegeEscalation: false
      readOnlyRootFilesystem: true
      capabilities:
        drop:
        - ALL
        add:
        - NET_BIND_SERVICE
3. Pod Security Admission
- Enable Pod Security Admission: Use the built-in admission controller to enforce Pod Security Standards.
- Set appropriate modes: Use enforce, audit, and warn modes as needed.
🔍 Network Security
1. Network Policies
- Implement default deny policies: Start with denying all traffic and then allow only necessary communication.
- Segment your network: Use network policies to create logical boundaries between applications.
1
2
3
4
5
6
7
8
9
10
11
# Example default deny policy
apiVersion: networking.k8s.io/v1
kind: NetworkPolicy
metadata:
  name: default-deny
  namespace: default
spec:
  podSelector: {}
  policyTypes:
  - Ingress
  - Egress
1
2
3
4
5
6
7
8
9
10
11
12
13
14
15
16
17
18
19
20
# Example allowing specific traffic
apiVersion: networking.k8s.io/v1
kind: NetworkPolicy
metadata:
  name: allow-frontend-to-backend
  namespace: default
spec:
  podSelector:
    matchLabels:
      app: backend
  policyTypes:
  - Ingress
  ingress:
  - from:
    - podSelector:
        matchLabels:
          app: frontend
    ports:
    - protocol: TCP
      port: 8080
2. Secure Ingress
- Use TLS for Ingress: Encrypt external traffic with TLS.
- Implement authentication: Add authentication to Ingress resources.
1
2
3
4
5
6
7
8
9
10
11
12
13
14
15
16
17
18
19
20
21
22
23
24
25
26
# Example Ingress with TLS
apiVersion: networking.k8s.io/v1
kind: Ingress
metadata:
  name: secure-ingress
  annotations:
    nginx.ingress.kubernetes.io/auth-type: basic
    nginx.ingress.kubernetes.io/auth-secret: basic-auth
    nginx.ingress.kubernetes.io/auth-realm: "Authentication Required"
spec:
  ingressClassName: nginx
  tls:
  - hosts:
    - secure.example.com
    secretName: tls-secret
  rules:
  - host: secure.example.com
    http:
      paths:
      - path: /
        pathType: Prefix
        backend:
          service:
            name: secure-service
            port:
              number: 80
🔐 Secrets Management
1. Kubernetes Secrets
- Avoid storing secrets in YAML files: Don’t commit secrets to version control.
- Encrypt secrets at rest: Enable encryption for etcd.
- Limit access to secrets: Use RBAC to restrict who can access secrets.
2. External Secrets Management
- Use external secrets providers: Integrate with tools like HashiCorp Vault, AWS Secrets Manager, or Azure Key Vault.
1
2
3
4
5
6
7
8
9
10
11
12
13
14
15
16
17
18
19
20
21
# Example using External Secrets Operator with AWS Secrets Manager
apiVersion: external-secrets.io/v1beta1
kind: ExternalSecret
metadata:
  name: example-external-secret
spec:
  refreshInterval: 1h
  secretStoreRef:
    name: aws-secretsmanager
    kind: SecretStore
  target:
    name: example-secret
  data:
  - secretKey: username
    remoteRef:
      key: example-secret
      property: username
  - secretKey: password
    remoteRef:
      key: example-secret
      property: password
🔍 Image Security
1. Image Scanning
- Scan images for vulnerabilities: Use tools like Trivy, Clair, or Snyk.
- Implement CI/CD scanning: Scan images as part of your CI/CD pipeline.
1
2
# Example using Trivy for image scanning
trivy image nginx:1.25.1
2. Image Pull Policies
- Use trusted registries: Pull images only from trusted sources.
- Implement image pull secrets: Authenticate with private registries.
1
2
3
4
5
6
7
8
9
10
11
# Example Pod with imagePullSecrets
apiVersion: v1
kind: Pod
metadata:
  name: private-image-pod
spec:
  containers:
  - name: private-container
    image: private-registry.example.com/my-app:1.0.0
  imagePullSecrets:
  - name: regcred
3. Admission Controllers
- Use OPA Gatekeeper or Kyverno: Implement policy-as-code for image validation.
1
2
3
4
5
6
7
8
9
10
11
12
13
14
# Example Gatekeeper constraint for allowed registries
apiVersion: constraints.gatekeeper.sh/v1beta1
kind: K8sAllowedRepos
metadata:
  name: allowed-repositories
spec:
  match:
    kinds:
    - apiGroups: [""]
      kinds: ["Pod"]
  parameters:
    repos:
    - "docker.io/library/*"
    - "gcr.io/my-project/*"
🔄 Runtime Security
1. Container Runtime Security
- Use secure container runtimes: Consider runtimes with enhanced security like gVisor or Kata Containers.
- Enable seccomp profiles: Restrict system calls available to containers.
1
2
3
4
5
6
7
8
9
10
11
12
13
# Example Pod with seccomp profile
apiVersion: v1
kind: Pod
metadata:
  name: seccomp-pod
spec:
  securityContext:
    seccompProfile:
      type: Localhost
      localhostProfile: profiles/audit.json
  containers:
  - name: seccomp-container
    image: nginx:1.25.1
2. Runtime Monitoring
- Implement runtime threat detection: Use tools like Falco to detect suspicious behavior.
1
2
3
4
5
6
# Example Falco rule for detecting privilege escalation
- rule: Privilege Escalation
  desc: Detect privilege escalation via setuid programs
  condition: evt.type=execve and evt.dir=> and proc.pname!=setuid_prog and proc.name=setuid_prog
  output: "Privilege escalation via setuid program (user=%user.name command=%proc.cmdline)"
  priority: WARNING
🔄 Compliance and Auditing
1. Compliance Frameworks
- Implement CIS Benchmarks: Follow the Center for Internet Security benchmarks for Kubernetes.
- Use kube-bench: Automate checking against CIS benchmarks.
1
2
# Run kube-bench to check compliance
kube-bench run --targets=master,node
2. Audit Logging
- Enable audit logging: Configure the Kubernetes API server to log all requests.
1
2
3
4
5
6
7
8
9
10
11
12
13
14
# Example audit policy
apiVersion: audit.k8s.io/v1
kind: Policy
rules:
- level: Metadata
  resources:
  - group: ""
    resources: ["secrets"]
- level: RequestResponse
  resources:
  - group: ""
    resources: ["pods"]
- level: Request
  verbs: ["create", "update", "patch", "delete"]
🚀 Security Tools and Platforms
1. Open Source Security Tools
- Trivy: Vulnerability scanner for containers and Kubernetes
- Falco: Runtime security monitoring
- kube-bench: CIS benchmark testing
- kube-hunter: Penetration testing tool for Kubernetes
- OPA Gatekeeper: Policy enforcement
2. Commercial Security Platforms
- Aqua Security: Container security platform
- Sysdig Secure: Container security and monitoring
- Prisma Cloud (formerly Twistlock): Cloud native security platform
- NeuVector: Container security platform
🌟 Security Best Practices Checklist
1️⃣ Cluster Hardening
|
2️⃣ Access Control
|
3️⃣ Pod Security
|
4️⃣ Network Security
|
5️⃣ Secrets Management
|
6️⃣ Image Security
|
7️⃣ Runtime Security
|
8️⃣ Compliance & Auditing
|
By implementing these security best practices, you can significantly reduce the attack surface of your Kubernetes clusters and protect your applications and data from potential threats.
🏁 Conclusion
Congratulations! You’ve completed a comprehensive journey through Kubernetes, covering everything from basic concepts to advanced topics. Let’s recap what we’ve learned:
-
Kubernetes Architecture: We examined the components that make up a Kubernetes cluster.
-
ConfigMaps and Secrets: We explored how to manage configuration and sensitive data in Kubernetes.
-
Container Resources and Probes: We learned how to allocate resources to containers and implement health checks for reliability.
-
Multi-Container Pods and Init Containers: We discovered patterns for running multiple containers together and initializing applications properly.
-
Storage Solutions: We covered Persistent Volumes, Persistent Volume Claims, and Storage Classes for managing stateful applications.
-
Services and Ingress: We explored how to expose and route traffic to your applications.
-
Workload Resources: We learned about Deployments, StatefulSets, DaemonSets, Jobs, and CronJobs for different application patterns.
-
RBAC and Authentication: We started with securing access to your cluster using Role-Based Access Control, creating users, roles, and bindings.
-
Networking and CNI: We delved into how networking works in Kubernetes and the different CNI plugins available.
-
Observability and Monitoring: We set up comprehensive monitoring for your applications and infrastructure.
-
Security Best Practices: We implemented security measures to protect your Kubernetes environment.
🚀 Next Steps
As you continue your Kubernetes journey, consider exploring these advanced topics:
-
Service Mesh: Dive deeper into service mesh technologies like Istio, Linkerd, or Consul for advanced microservices capabilities.
-
Operators: Learn how to build Kubernetes Operators to automate complex application management.
-
Multi-Cluster Management: Explore tools like Cluster API, Rancher, or Fleet for managing multiple Kubernetes clusters.
-
Policy Management: Implement policy-as-code using OPA Gatekeeper or Kyverno.
-
Cost Optimization: Learn strategies for optimizing Kubernetes resource usage and reducing cloud costs.
📚 Recommended Resources
Official Documentation
Tools
🌟 Final Thoughts
Kubernetes has revolutionized how we deploy, scale, and manage applications. While it has a steep learning curve, the benefits of standardization, portability, and automation make it worth the investment. Remember that Kubernetes is just a tool—focus on solving real business problems and delivering value to your users.
As the Kubernetes ecosystem continues to evolve, stay curious and keep learning. The community is vibrant and supportive, so don’t hesitate to ask questions and share your experiences.
Happy Kubernetes journey! 🚢 ☸️